Effective Tips for Knee and Lower Back Pain Relief
Discover essential tips to reduce knee pain and lower back pain. Explore effective exercises specifically designed for lower back pain relief and enhance your mobility with our expert advice.
Harmony Fitness/Ece
12/18/202414 min read
Knee and lower back pain are common issues that affect millions of people worldwide, especially those with sedentary lifestyles, athletes, or individuals who frequently perform strenuous physical activities. While chronic pain might require medical intervention, mild to moderate discomfort can often be managed through a combination of stretching, massage, and targeted exercises. This article explores effective strategies to relieve pain and improve mobility.
The Importance of Stretching for Pain Relief
Stretching is a simple yet effective way to release muscle tension, improve flexibility, and enhance blood circulation to reduce stiffness and pain. Regular stretching can help:
Relieve pressure on joints and muscles.
Strengthen supporting muscles.
Increase mobility and prevent future pain.
1. Best Stretches for Lower Back Pain
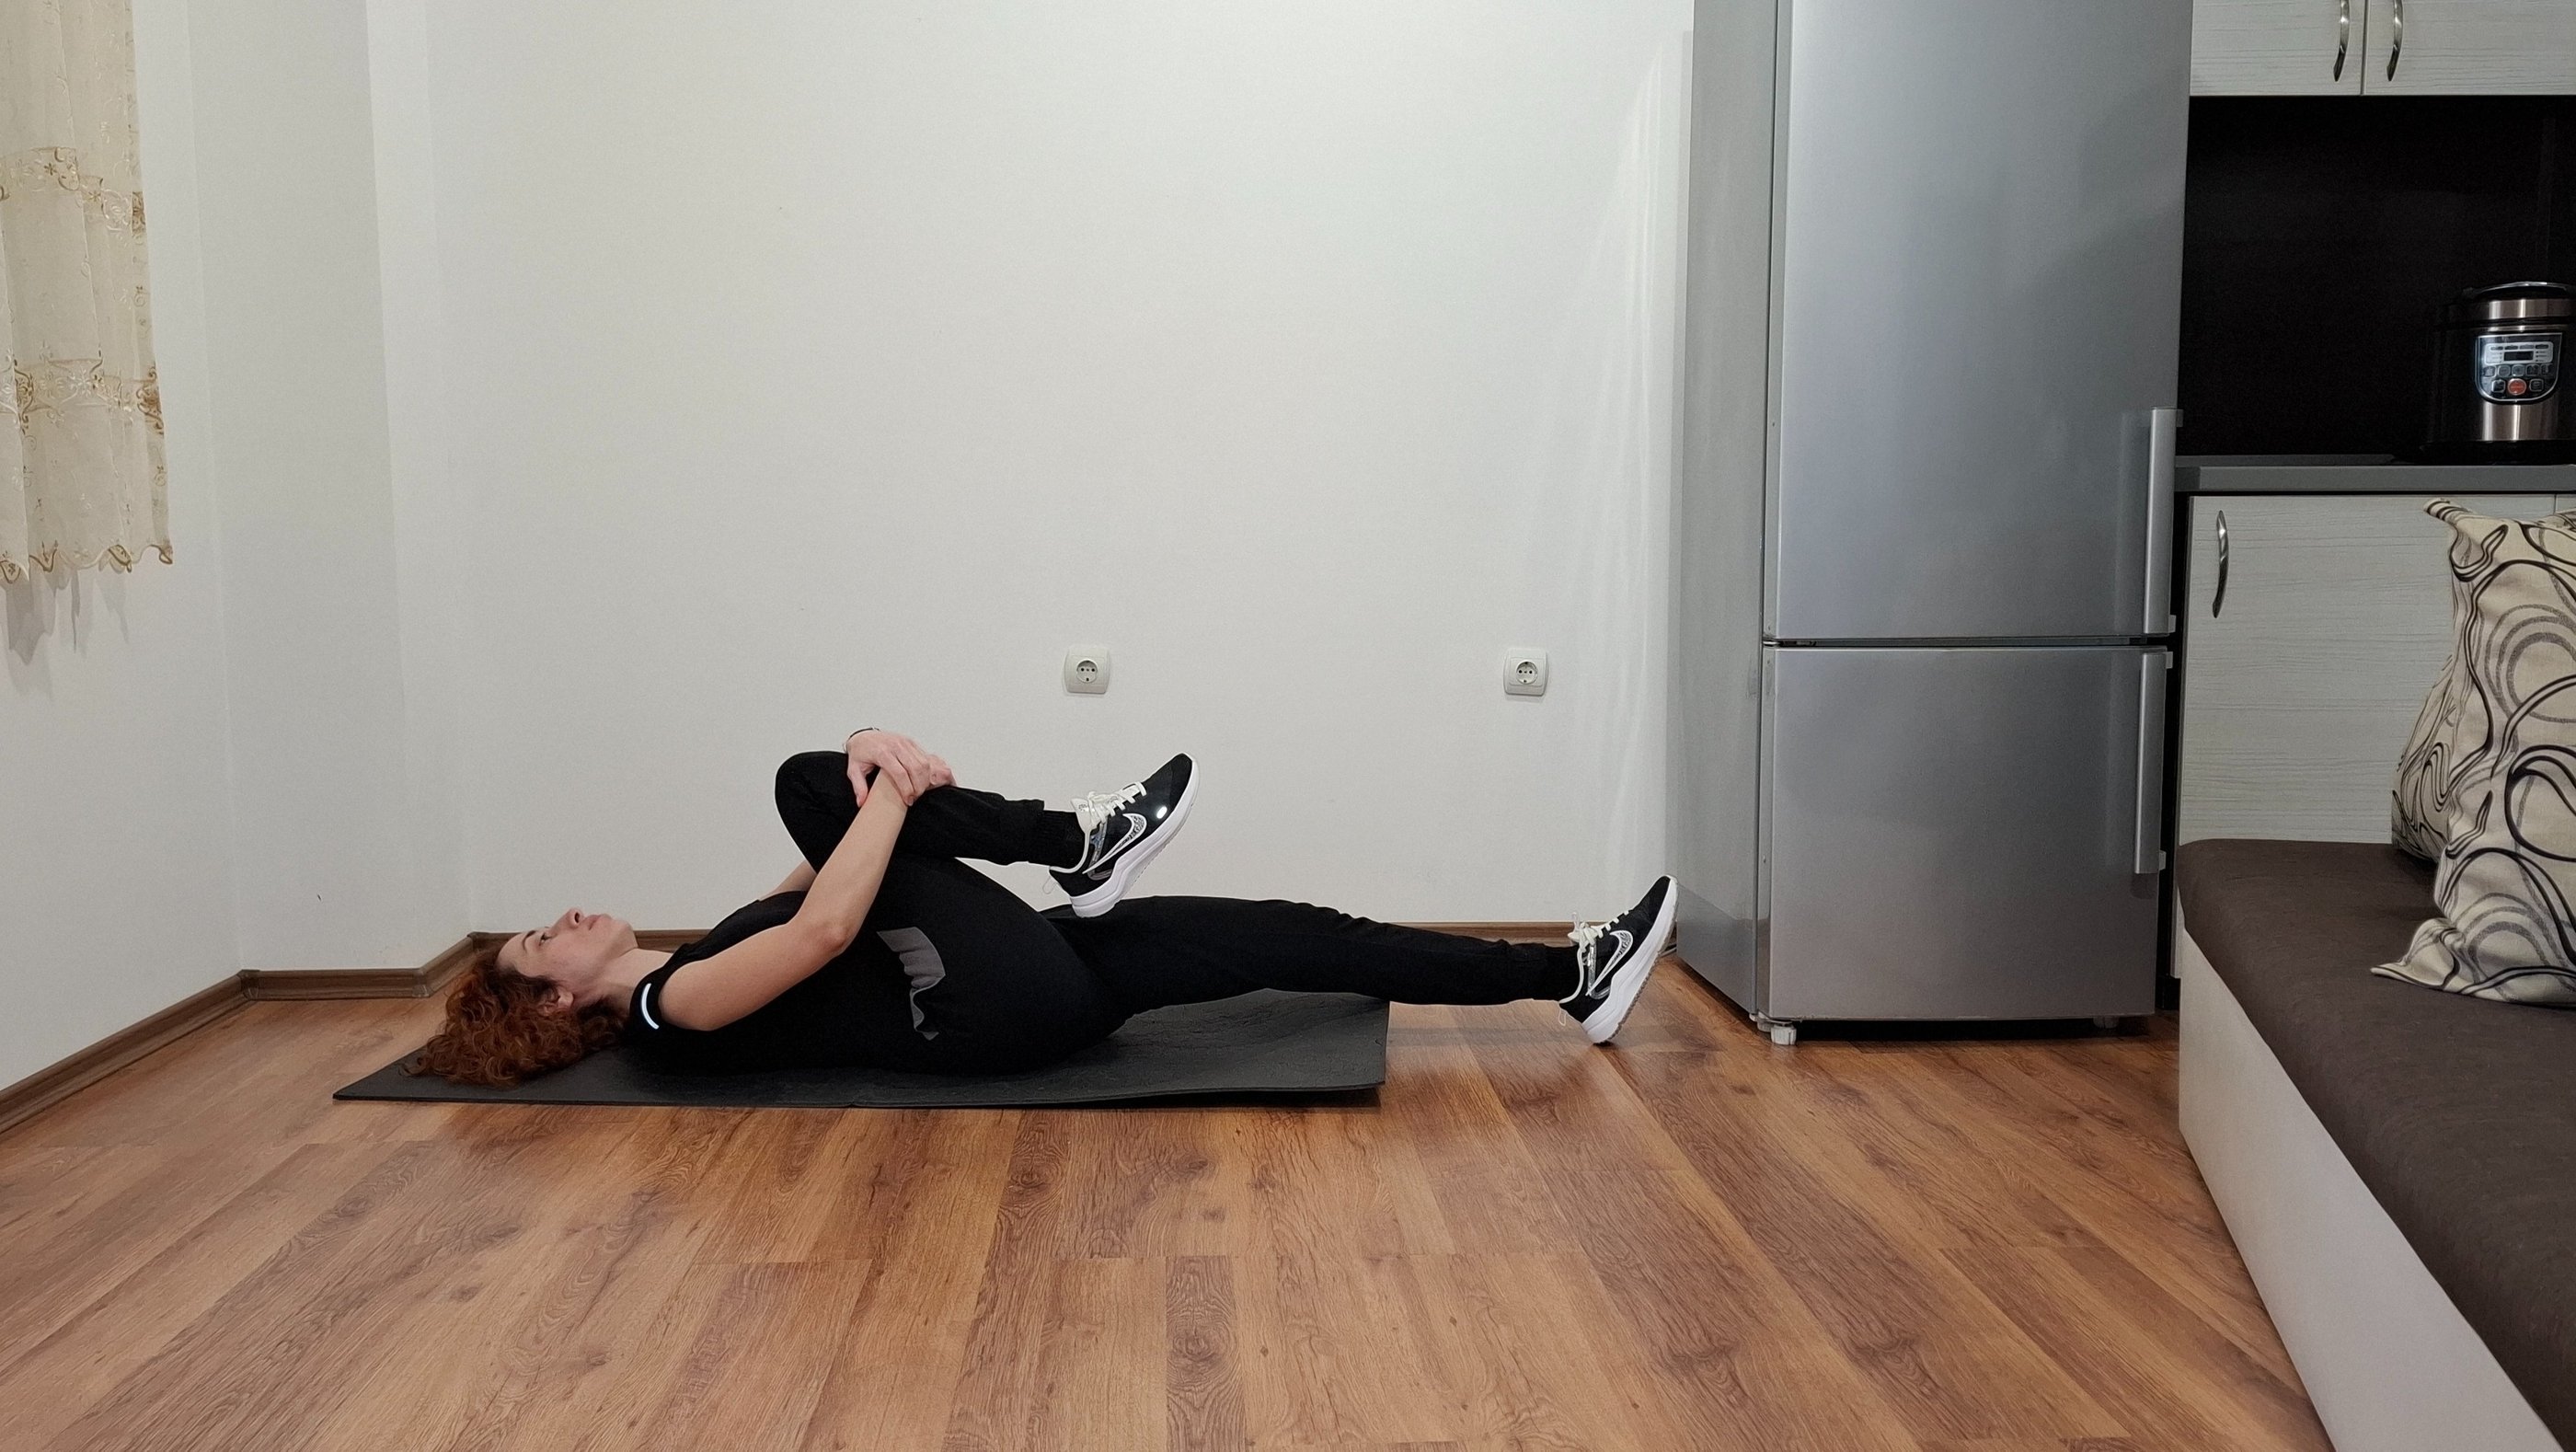
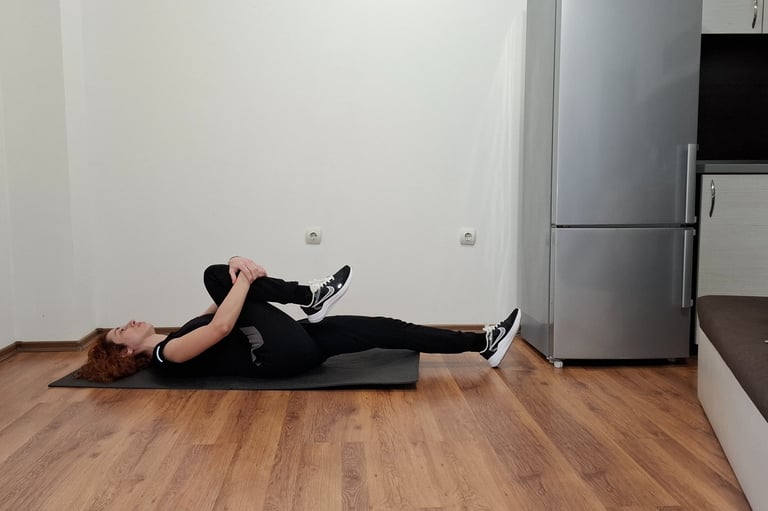
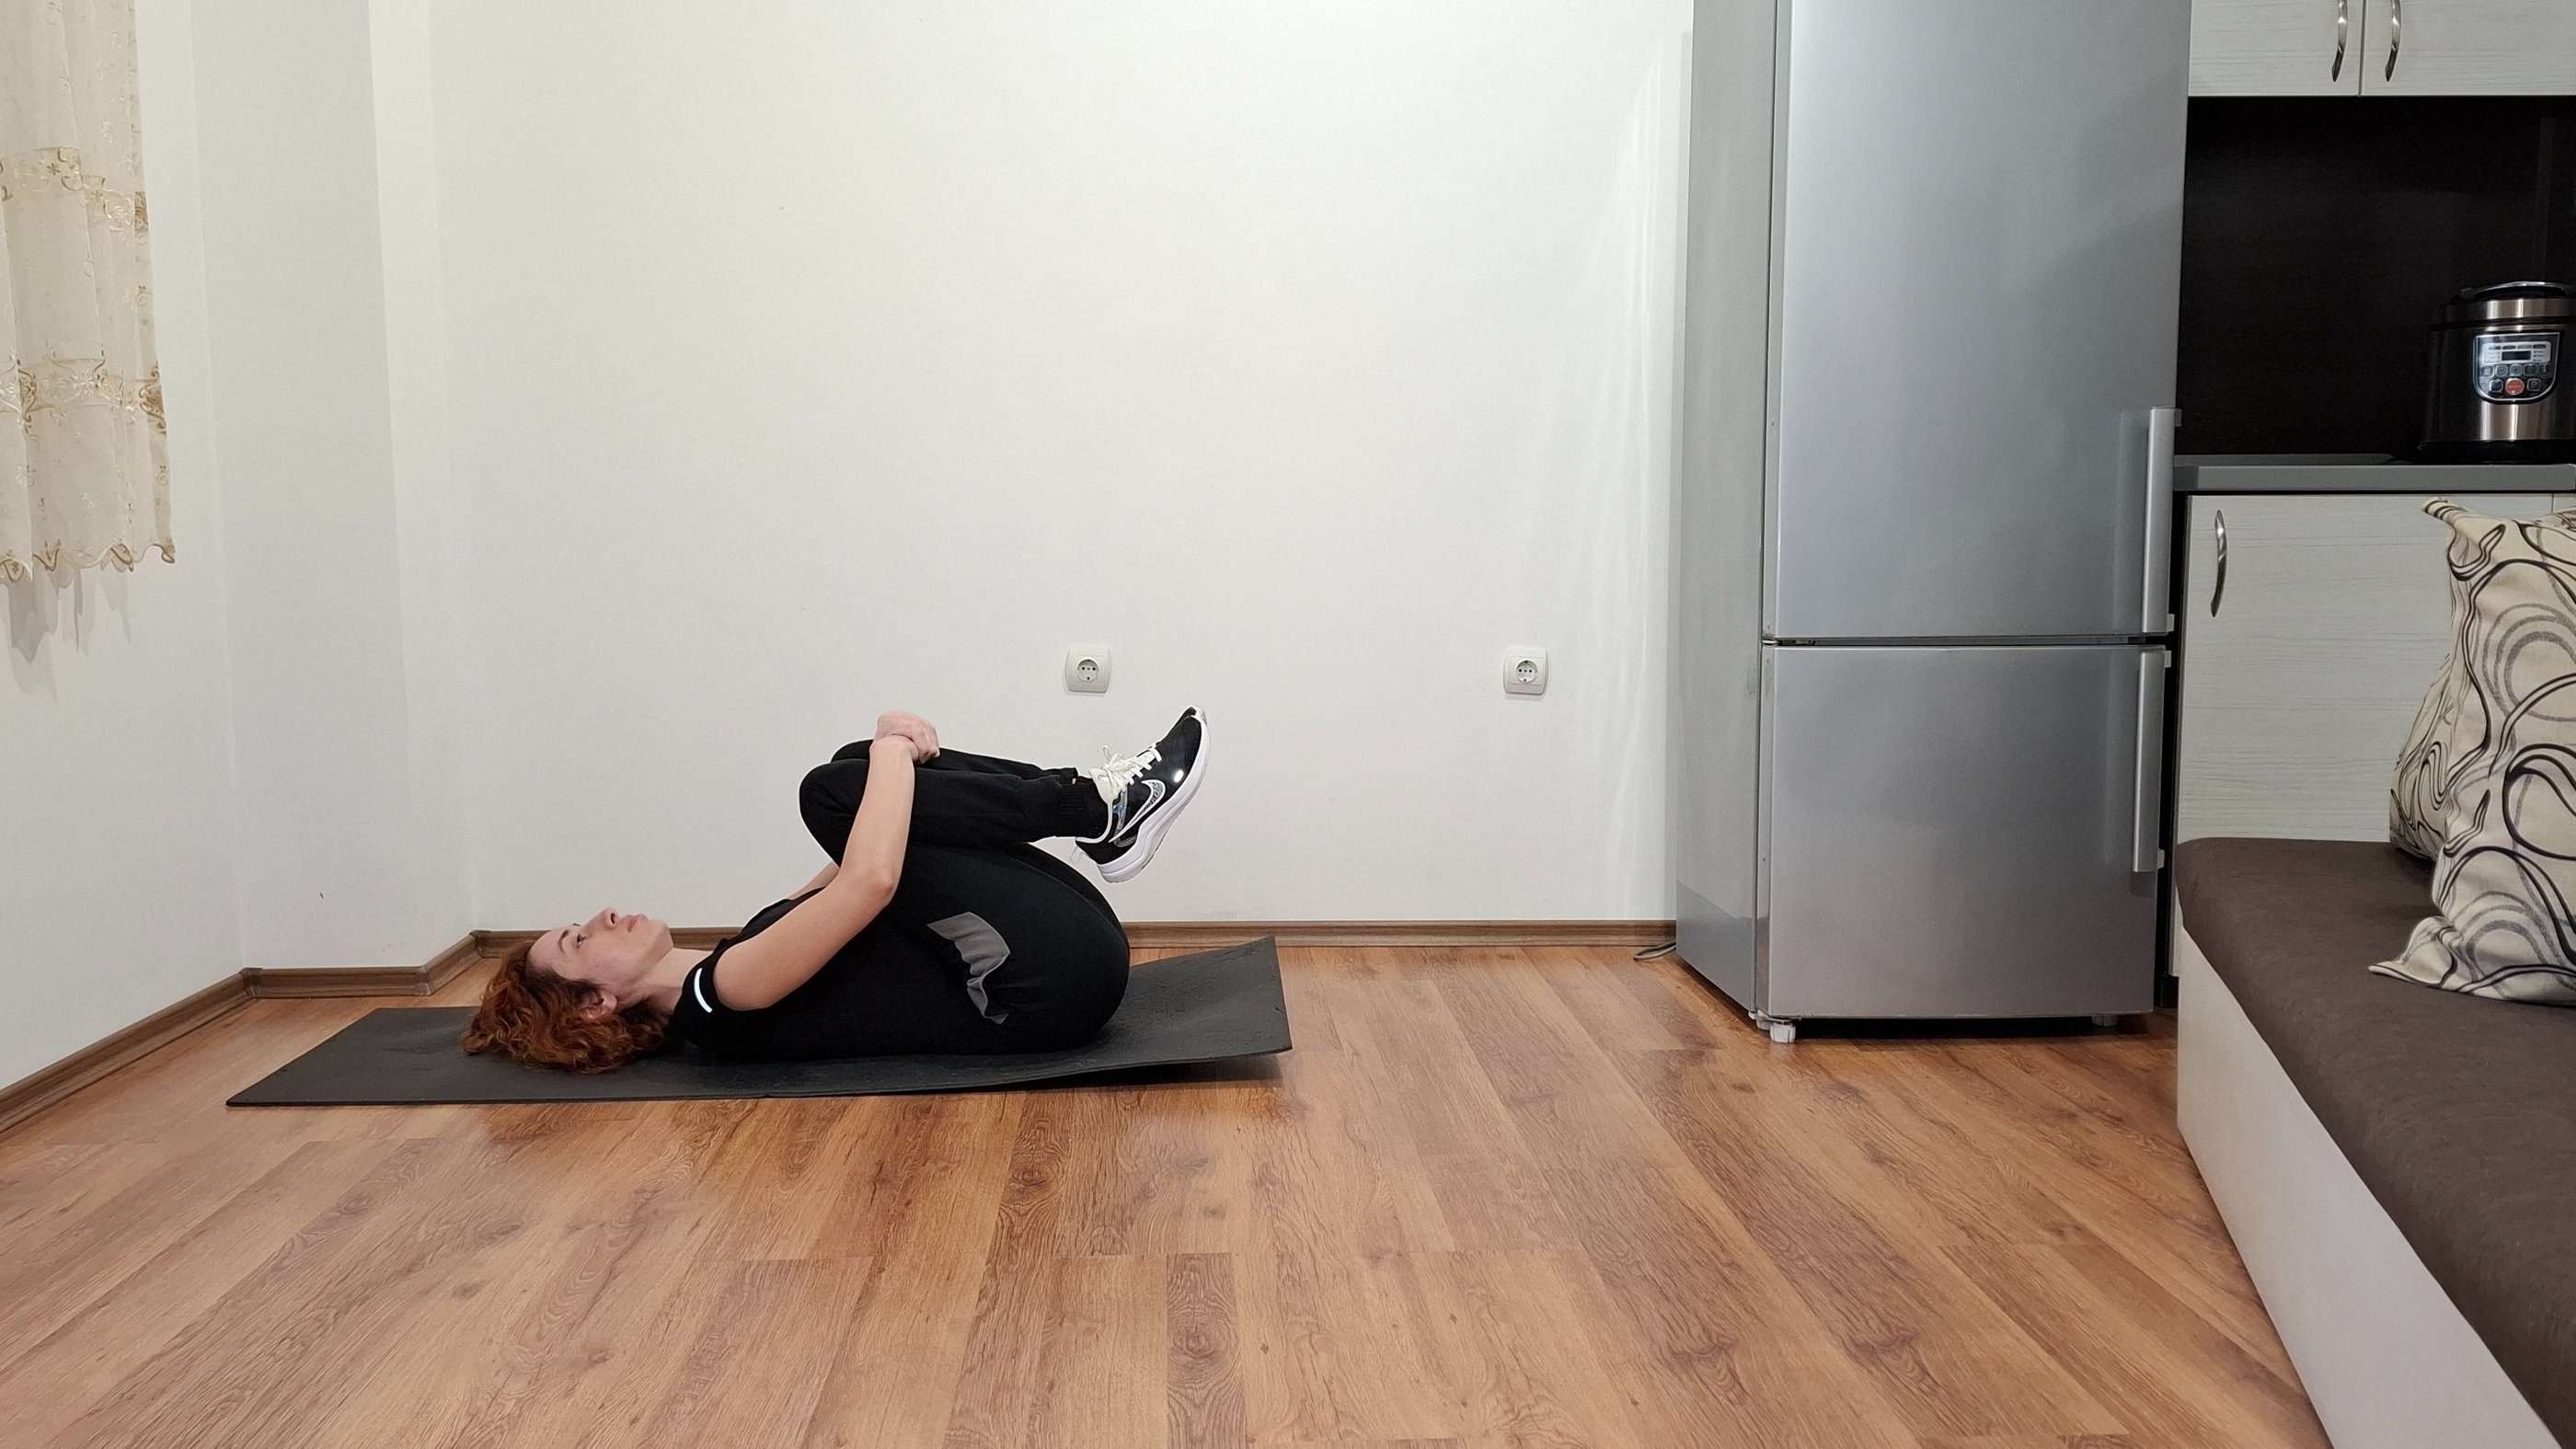
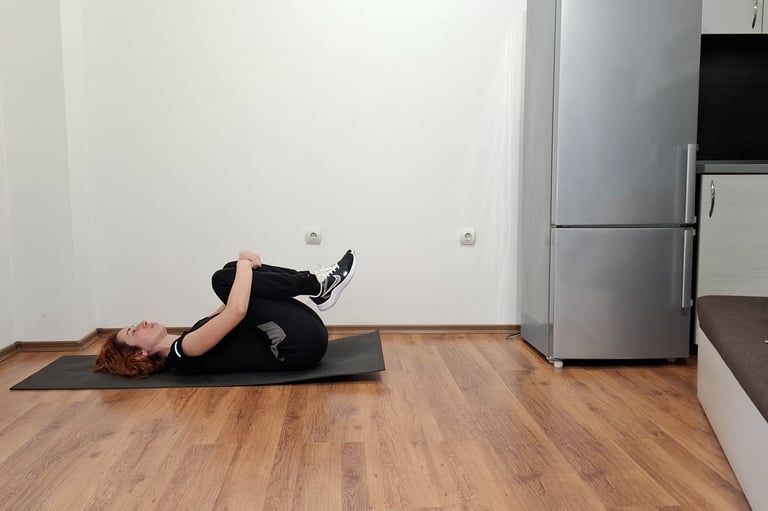
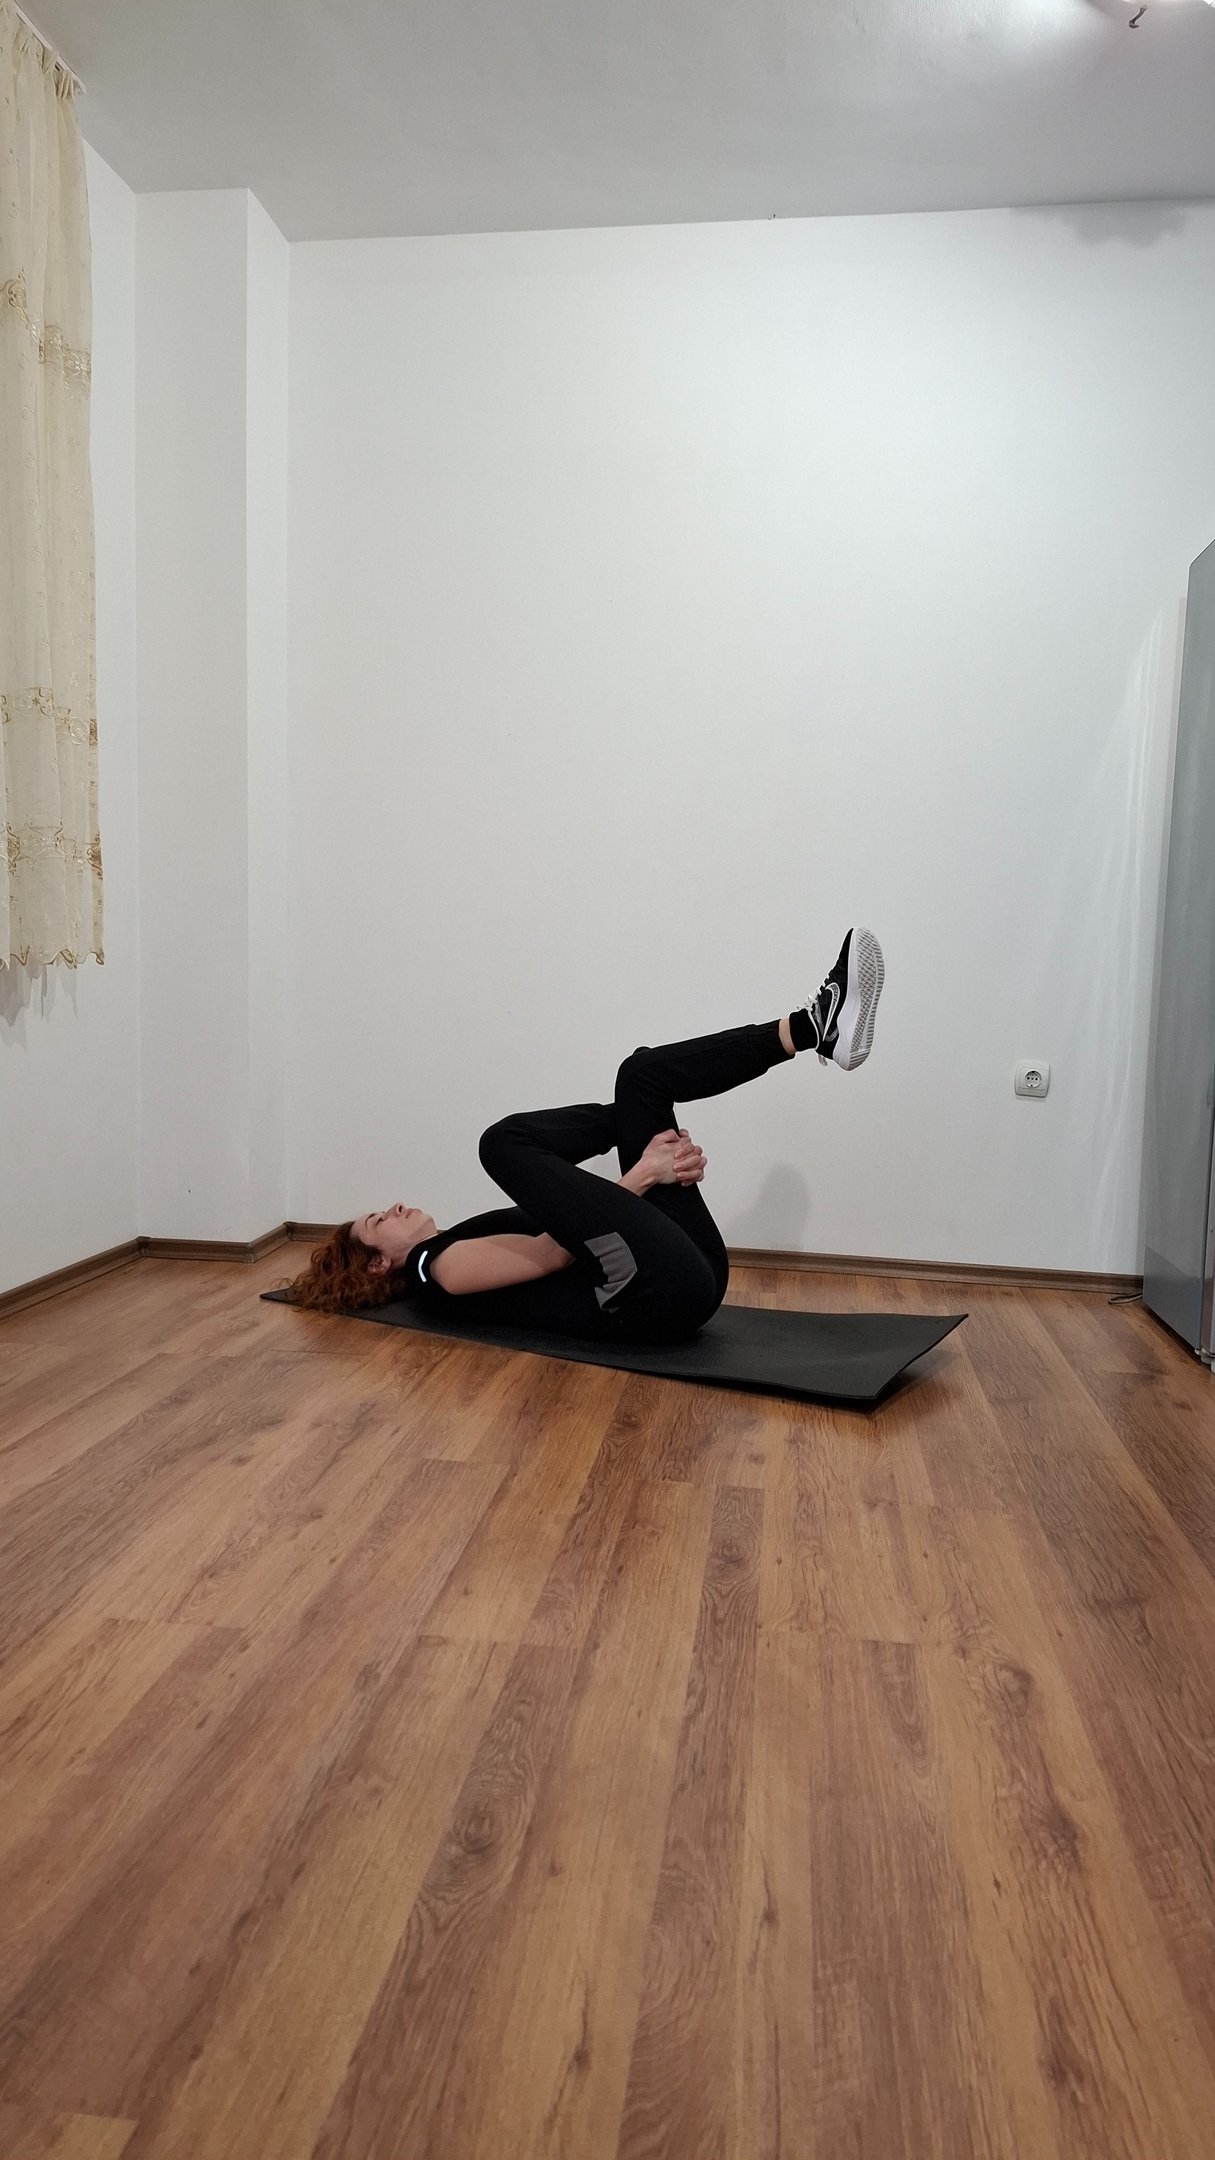
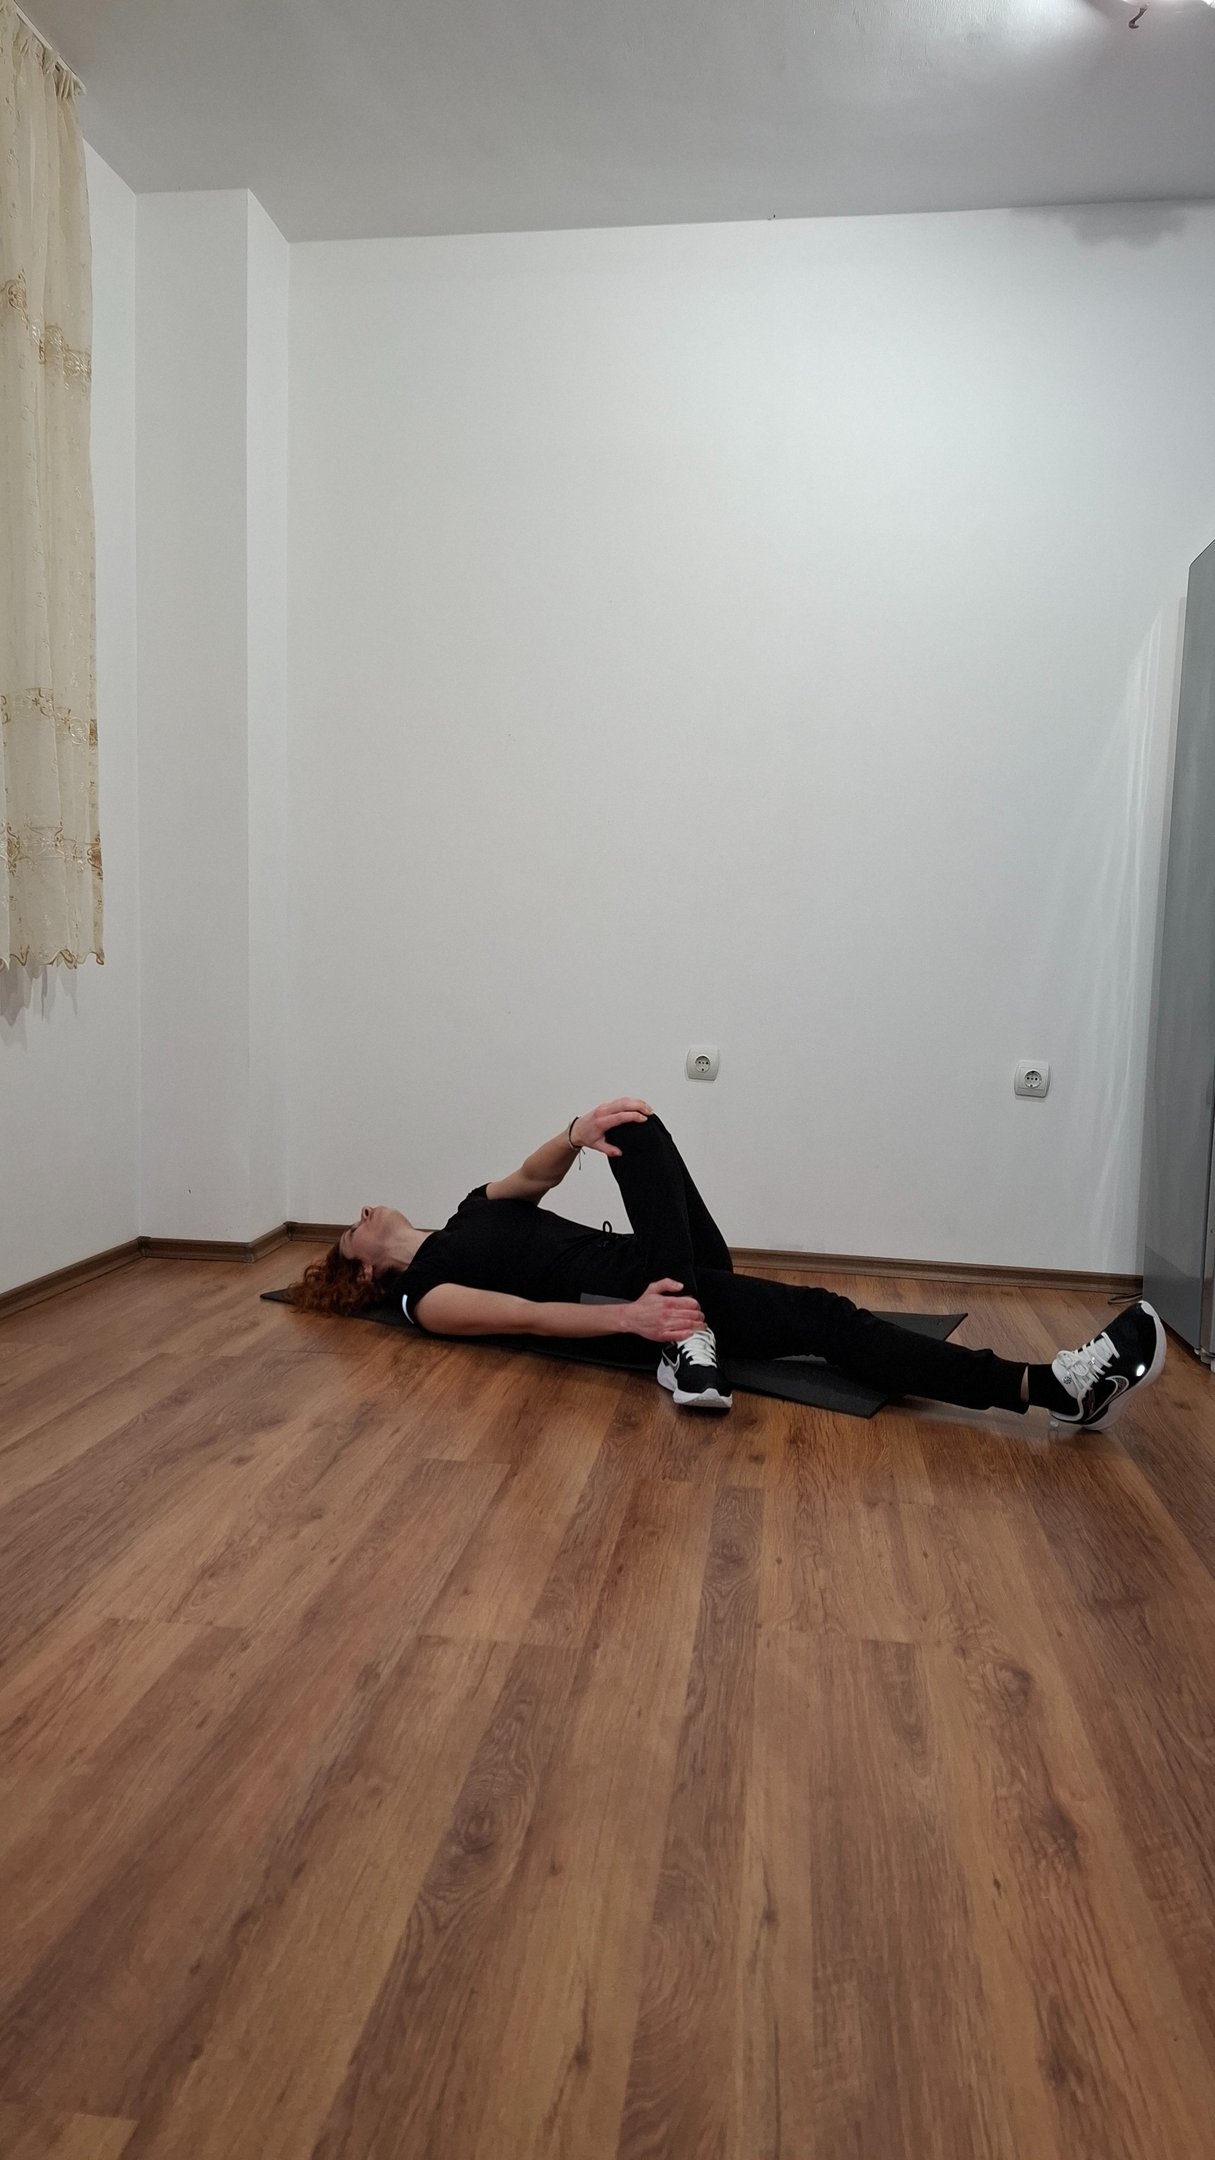
A. Knee-to-Chest Stretch (Single and Double Leg)
The knee-to-chest stretch helps release tension in the lower back and glutes while gently stretching the spine.
How to Perform:
Lie on your back on a yoga mat or soft surface.
For the single knee-to-chest stretch, bring one knee up towards your chest, keeping the other leg extended. Hold for 20-30 seconds, then switch legs.
For the double knee-to-chest stretch, bring both knees up to your chest and gently hug them.
Breathe deeply and hold for 20-30 seconds. Repeat 2-3 times.
B. Supine Spine Twist
The supine spine twist releases lower back tension, improving spinal mobility and relieving stiffness.
How to Perform:
Lie on your back with your legs extended.
Bend your right knee and gently cross it over your left side, keeping your shoulders flat on the floor.
Extend your right arm out to the side and look towards your right hand.
Hold the position for 20-30 seconds and switch sides.
Repeat 2-3 times on each side.

C. Cat-Cow Stretch
The cat-cow stretch increases spinal flexibility, improves posture, and relieves lower back tension.
How to Perform:
Begin on all fours with your wrists under your shoulders and knees under your hips.
Inhale, arch your back, and lift your head and tailbone (cow pose).
Exhale, round your back, and tuck your chin to your chest (cat pose).
Perform the movement slowly, flowing with your breath.
Repeat 8-10 times.
2. Stretching Exercises for Knee Pain Relief
Stretching the muscles around the knee, such as the quadriceps, hamstrings, and calves, helps improve flexibility, reduce stiffness, and alleviate knee pain. Below are effective stretches specifically for the knee:
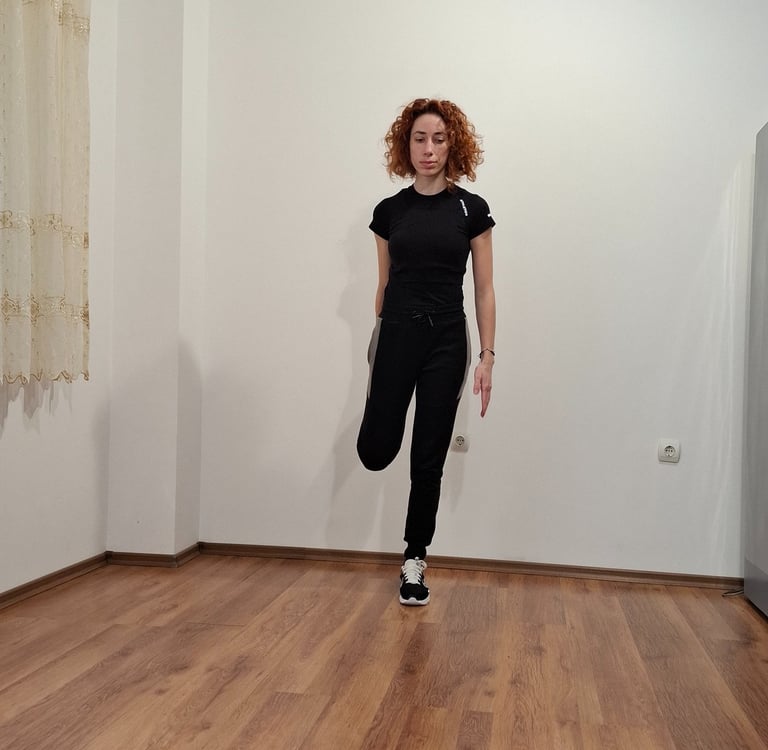
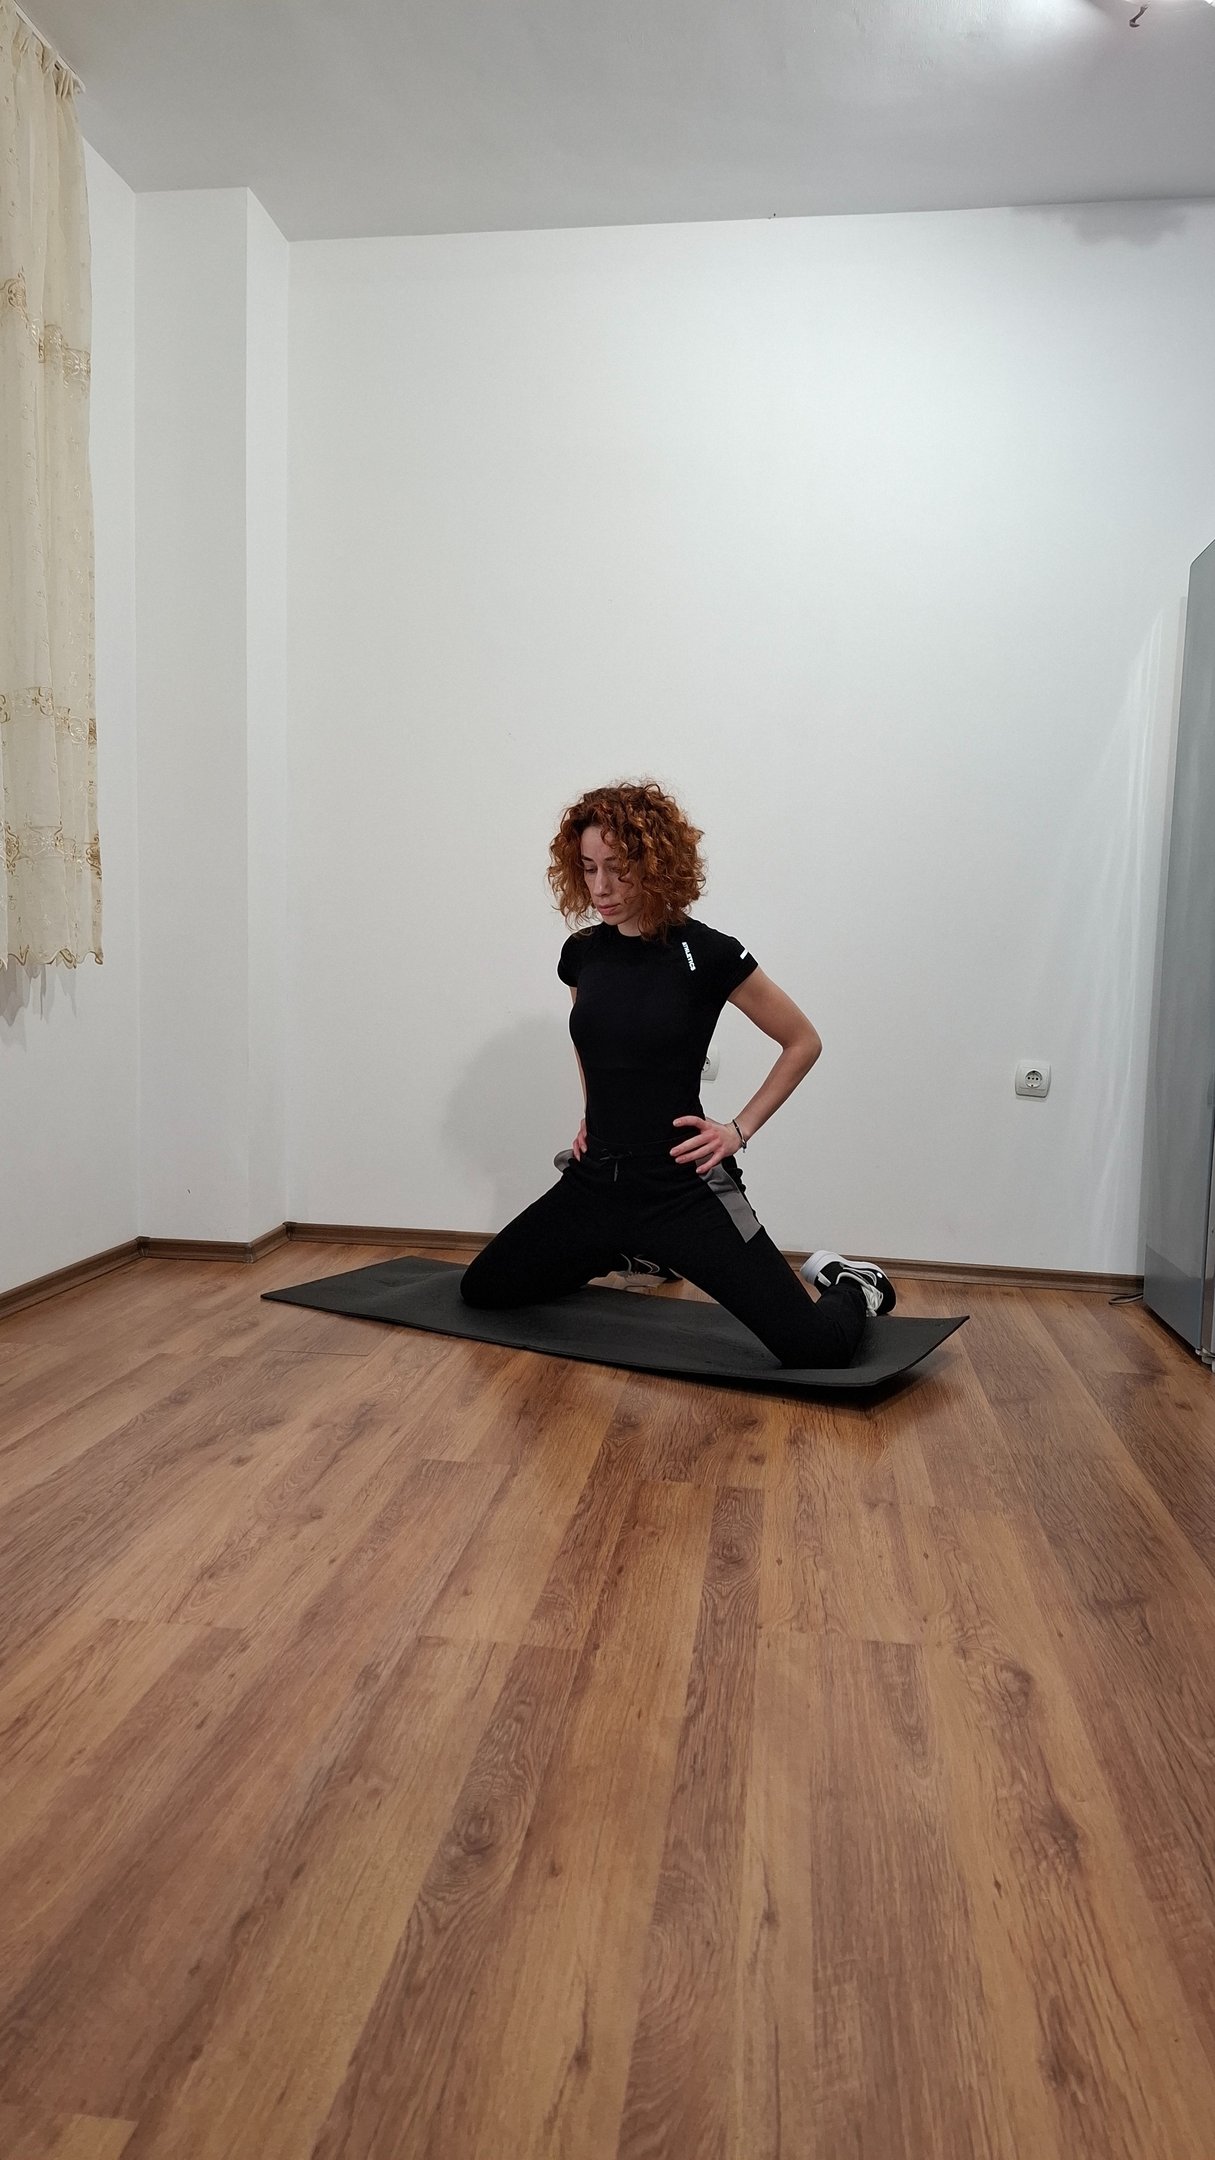
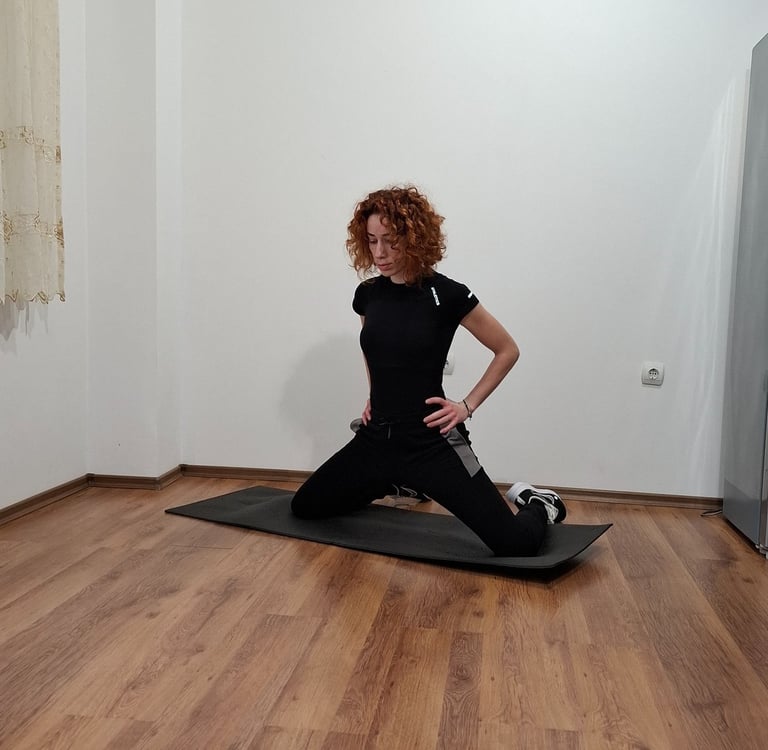
A. Quadriceps Stretch
This stretch targets the front thigh muscles (quadriceps), which play a key role in stabilizing the knee.
How to Perform:
Stand tall and hold onto a chair or wall for balance.
Bend your right knee and bring your heel toward your glutes.
Grasp your ankle with your right hand and gently pull it closer to stretch the front of your thigh.
Hold for 20-30 seconds, then switch to the other leg.
Repeat 2-3 times on each side.
If you prefer, you can also do this on the ground as shown in the picture.
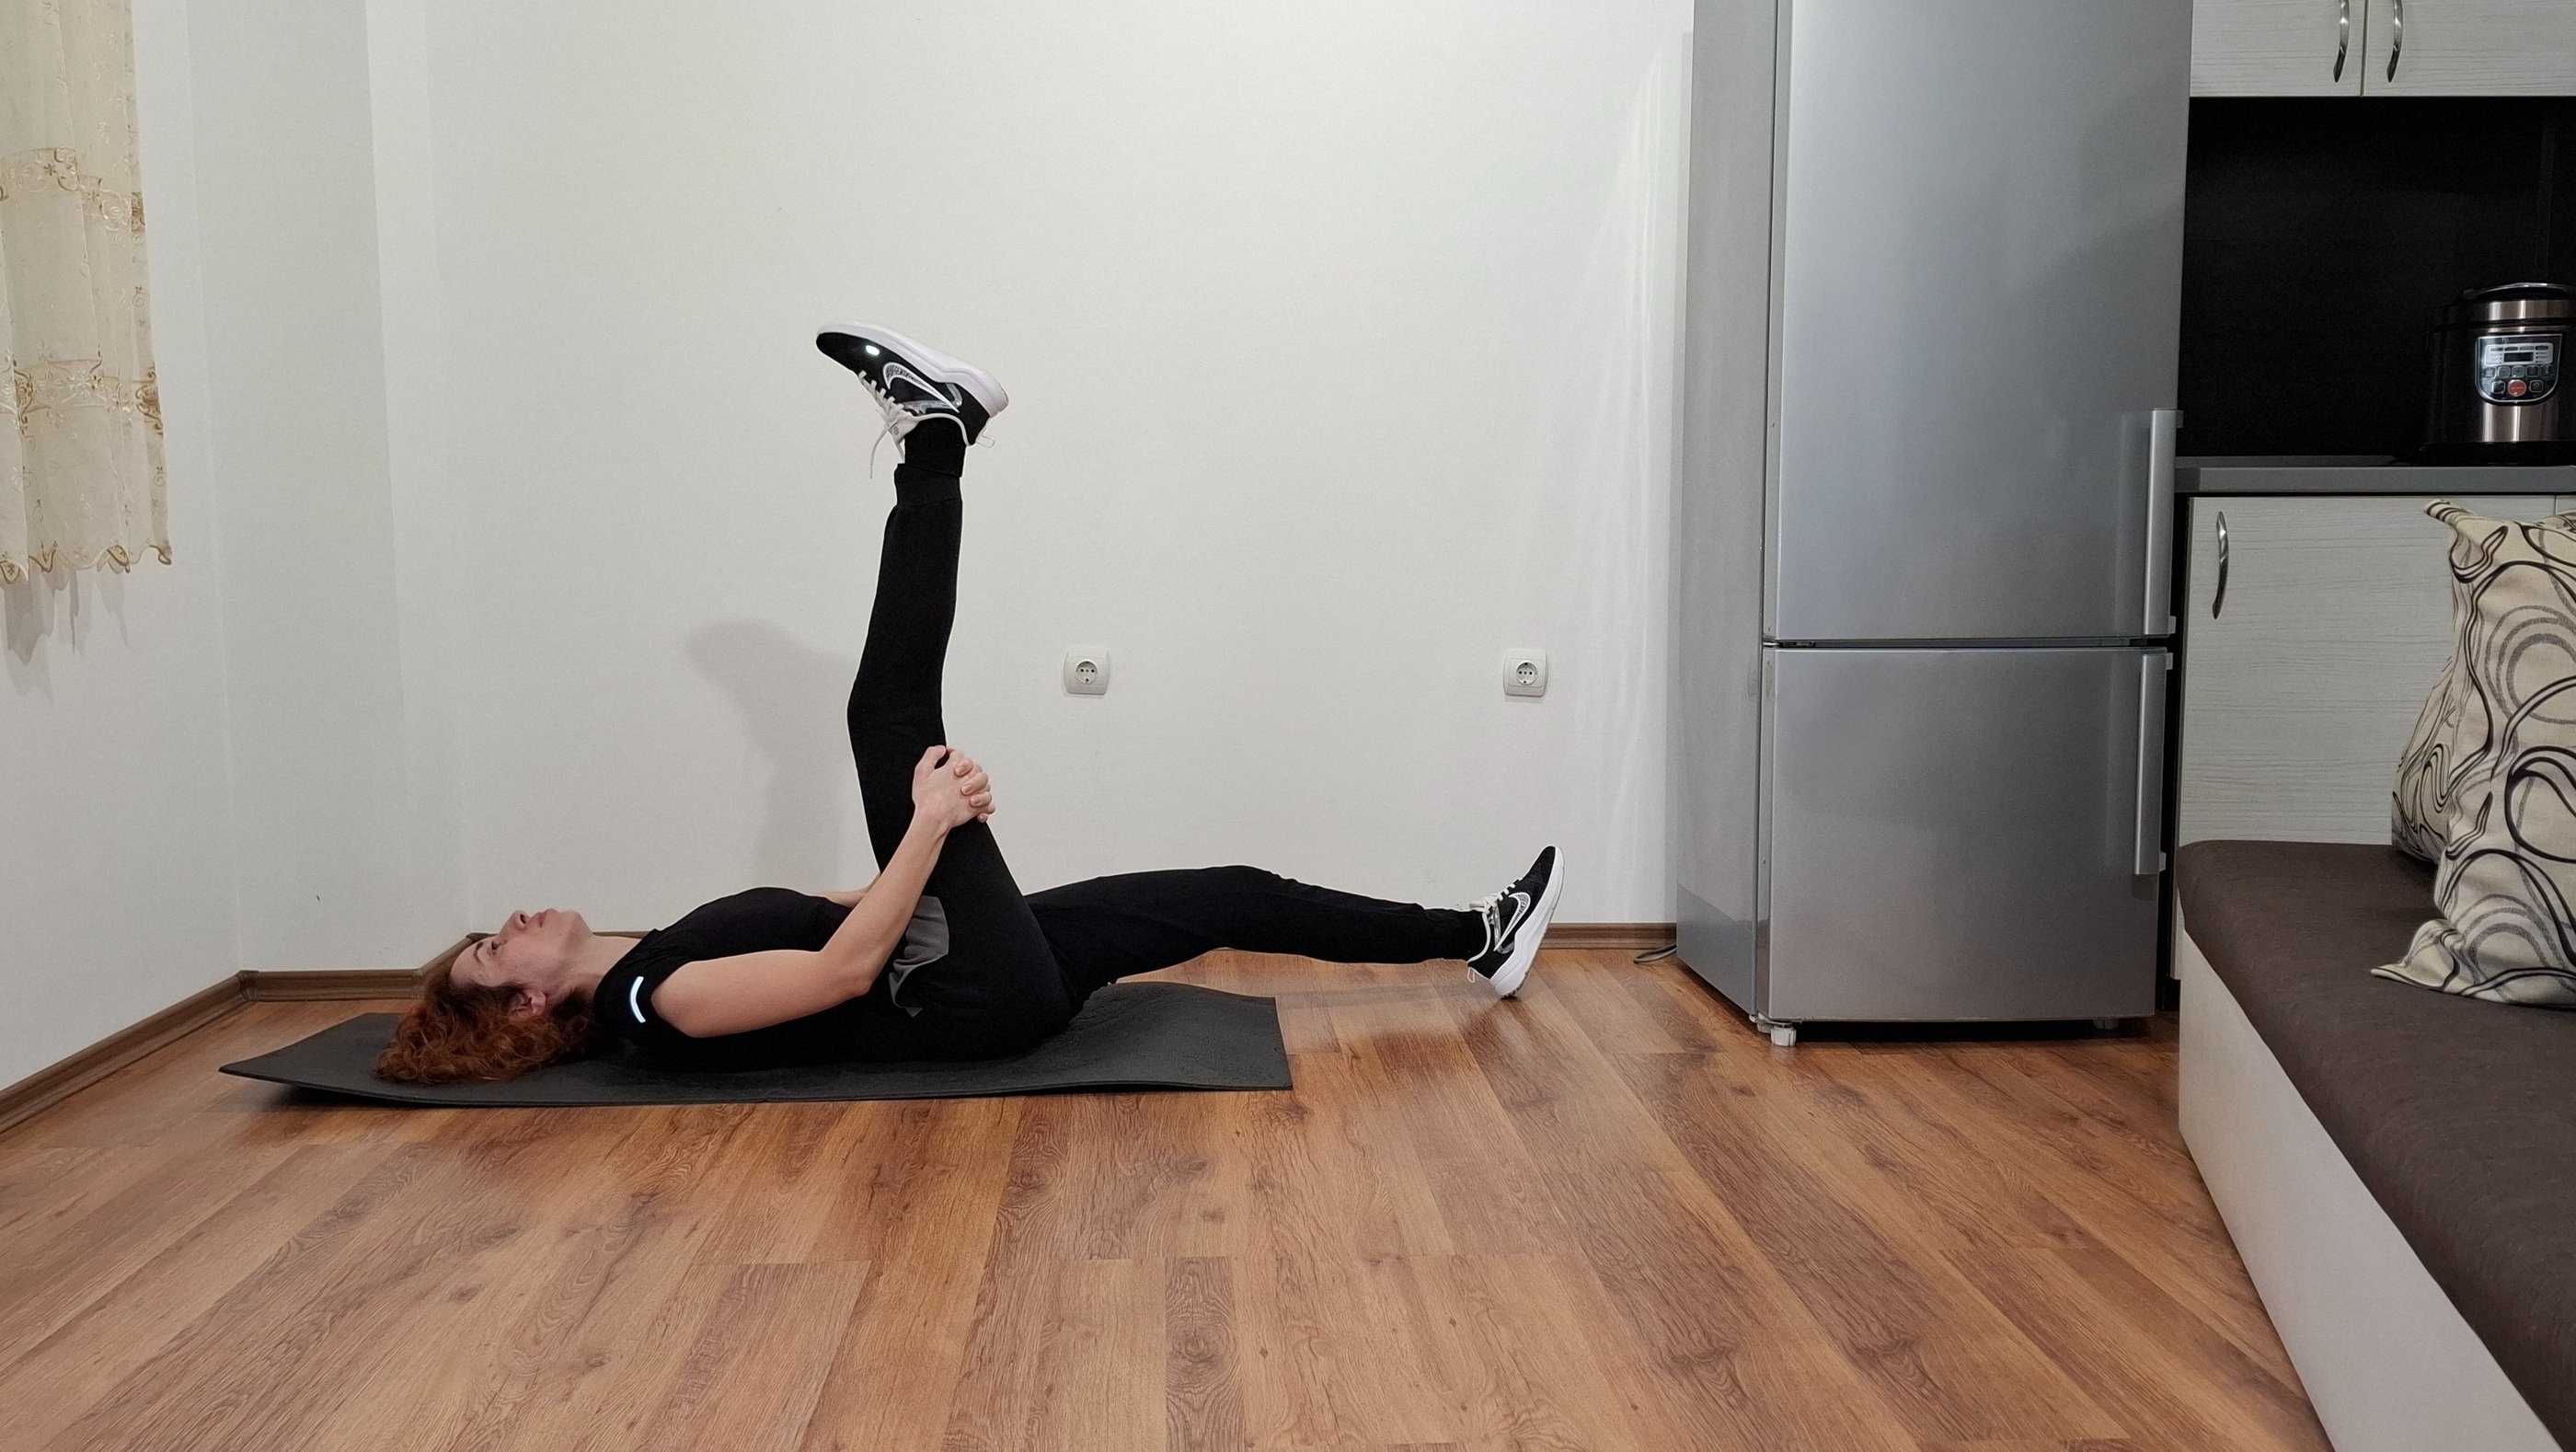
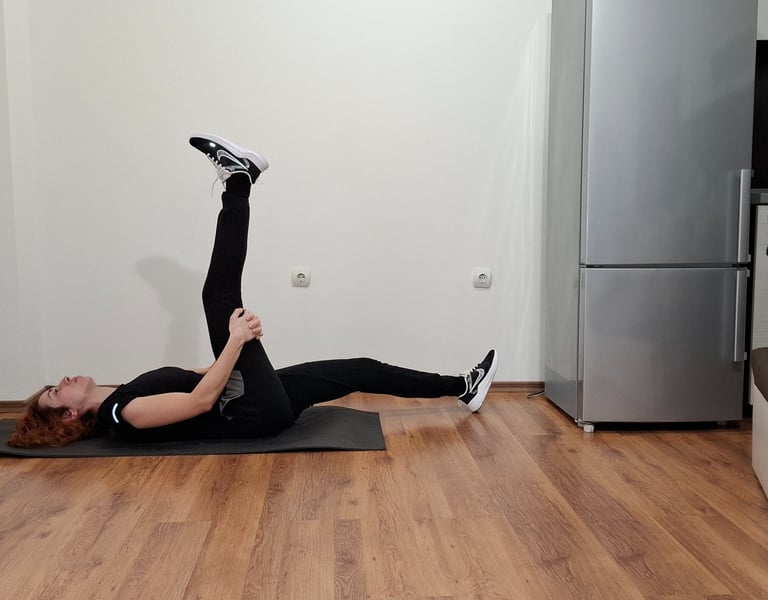
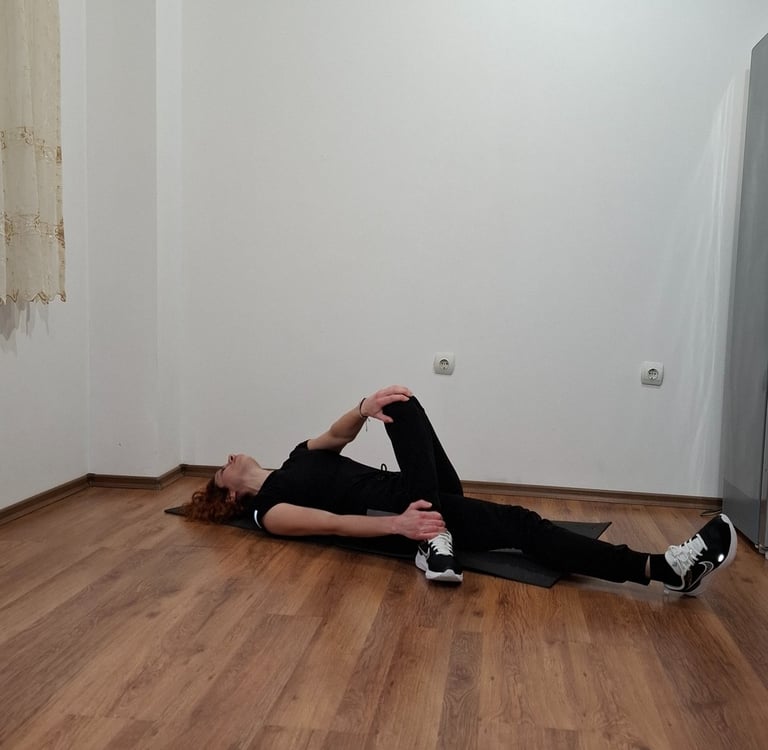
B. Hamstring Stretch
The hamstrings are a group of muscles at the back of the thigh that play a crucial role in knee and hip mobility. Stretching them can reduce tightness, improve flexibility, and alleviate knee and lower back pain.
Supine Hamstring Stretch (Lying Down)
This stretch is great for gently loosening the hamstrings without putting pressure on the lower back or knees.
How to Perform:
Lie flat on your back on a yoga mat or comfortable surface.
Extend both legs straight out.
Lift one leg toward the ceiling, keeping it as straight as possible.
Grasp the back of your thigh, calf, or ankle (depending on your flexibility) with both hands.
Pull your leg gently toward you until you feel a stretch in the back of your thigh.
Hold the stretch for 20-30 seconds, then lower the leg.
Switch legs and repeat 2-3 times on each side.
Tips:
For greater flexibility, place your other leg straight on the floor.
Avoid locking your knee; keep it slightly soft to prevent strain.
Alternative Hamstring Stretches
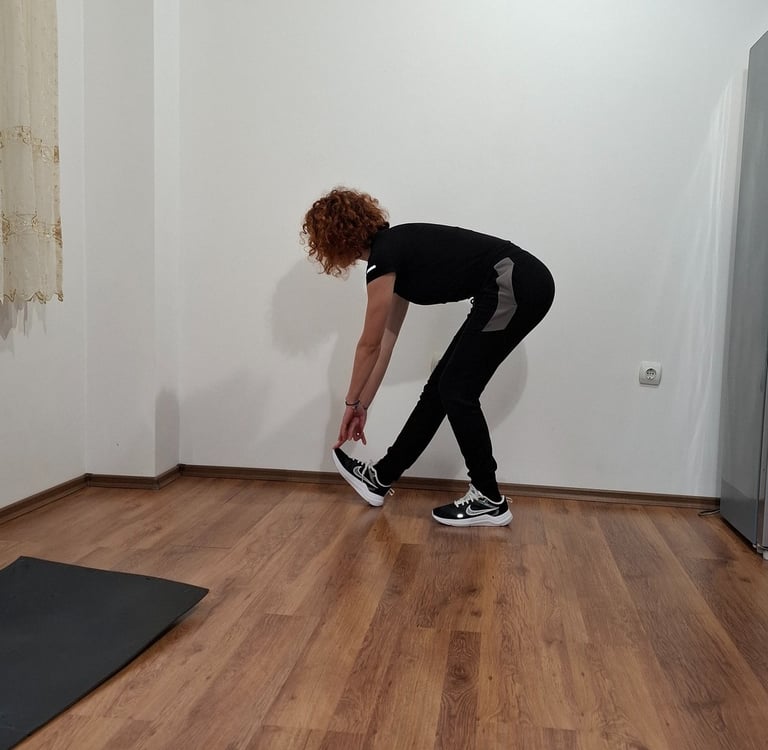
1. Standing Hamstring Stretch (Toe Lift)
This stretch targets the hamstrings while engaging balance and improving overall flexibility.
How to Perform:
Stand tall with one foot slightly in front of the other.
Extend the front leg, keeping the heel on the floor and the toes pointing upward.
Hinge forward at the hips, keeping your back straight, and reach toward the toes of the extended leg.
Stop when you feel a stretch in the back of your thigh.
Hold for 20-30 seconds, then switch legs.
Repeat 2-3 times per leg.
Tips:
Keep your hips level and avoid rounding your back.
Use a chair or wall for balance if needed.

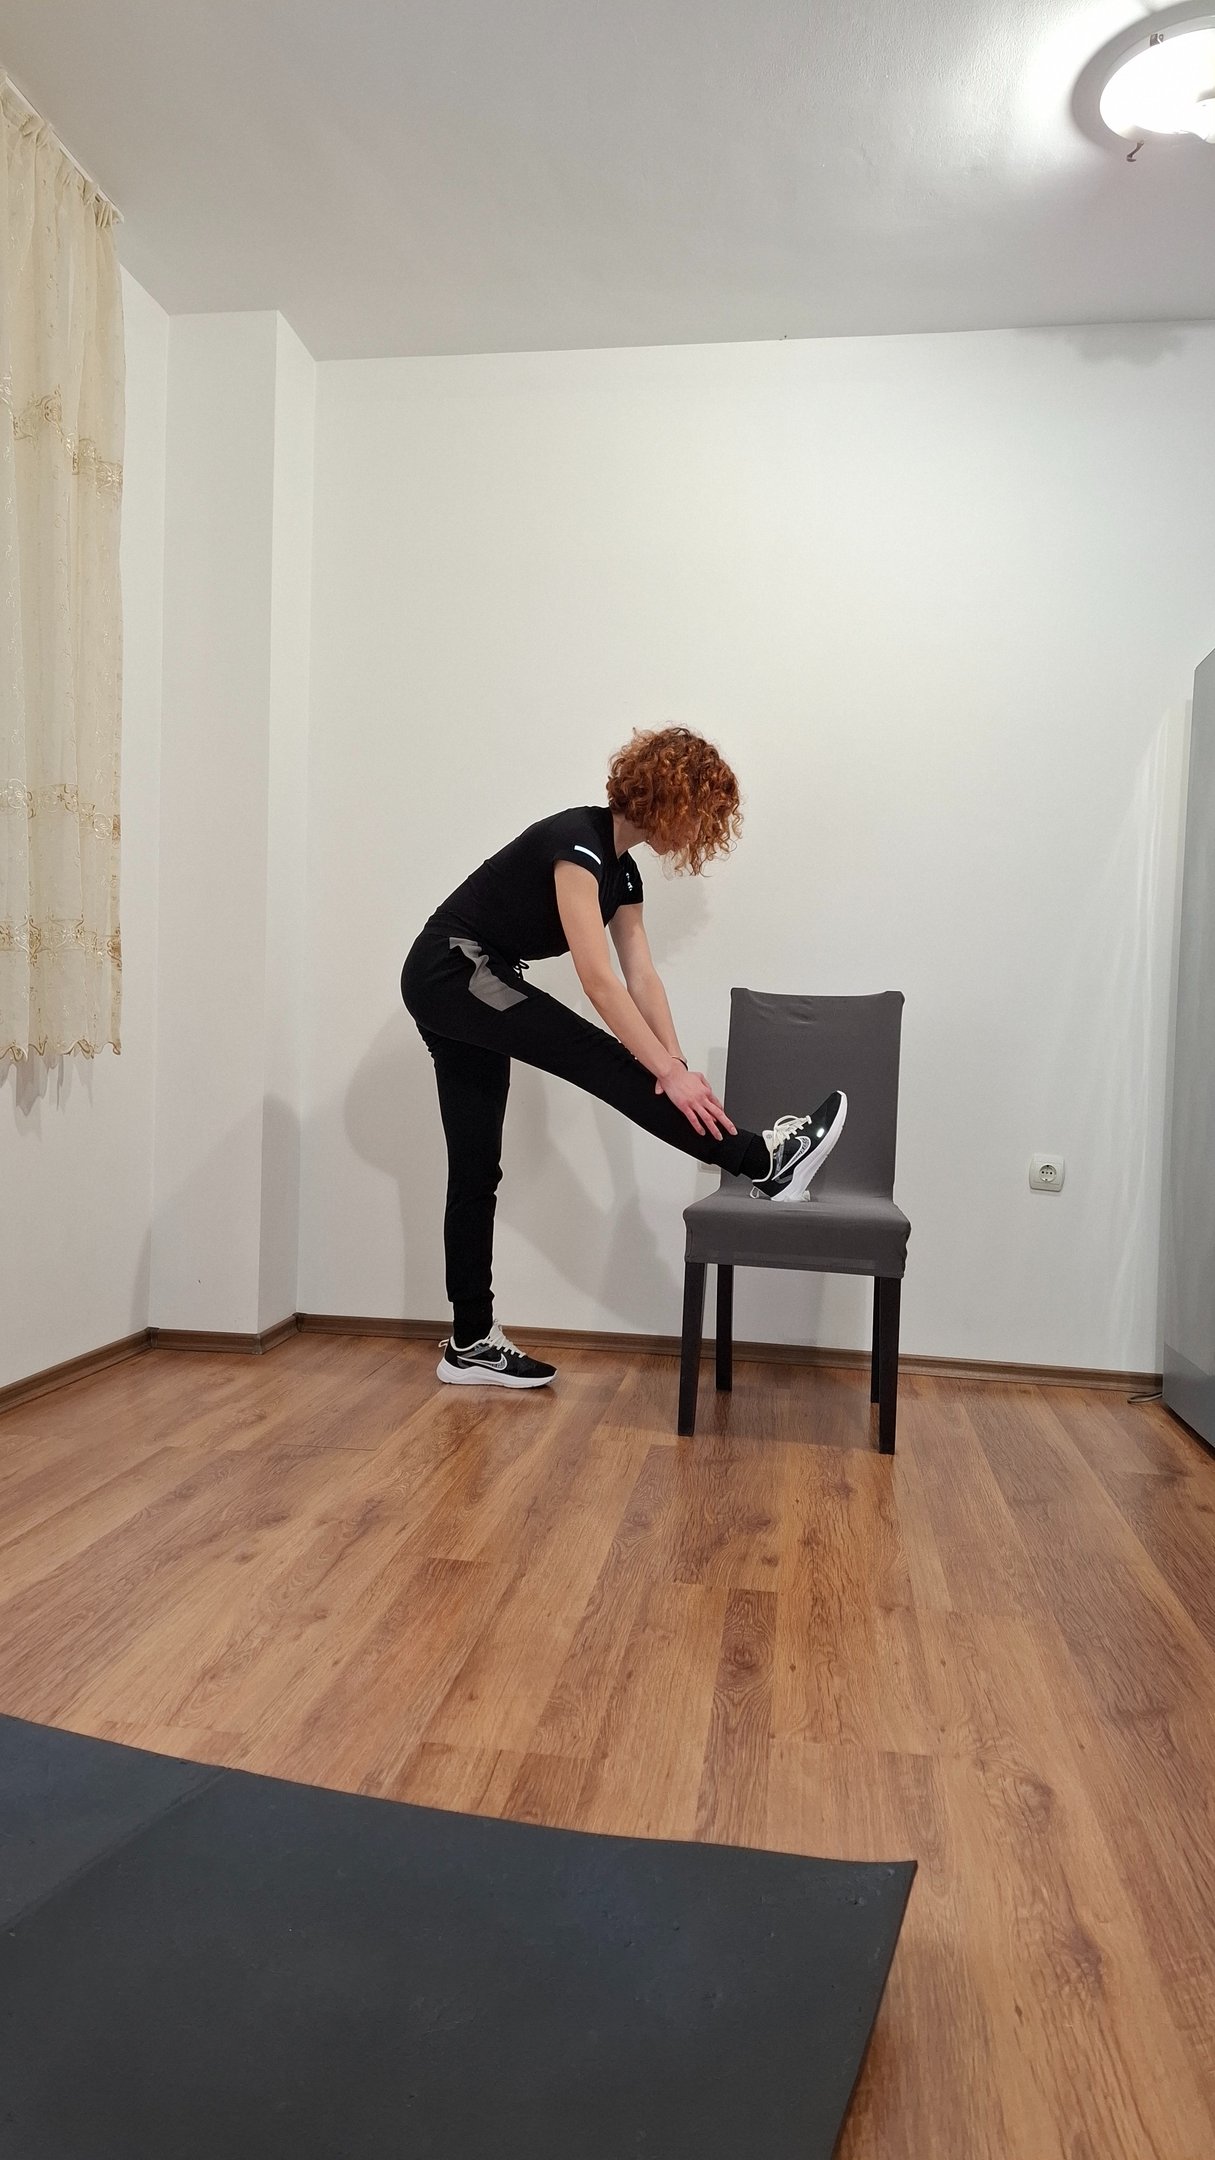
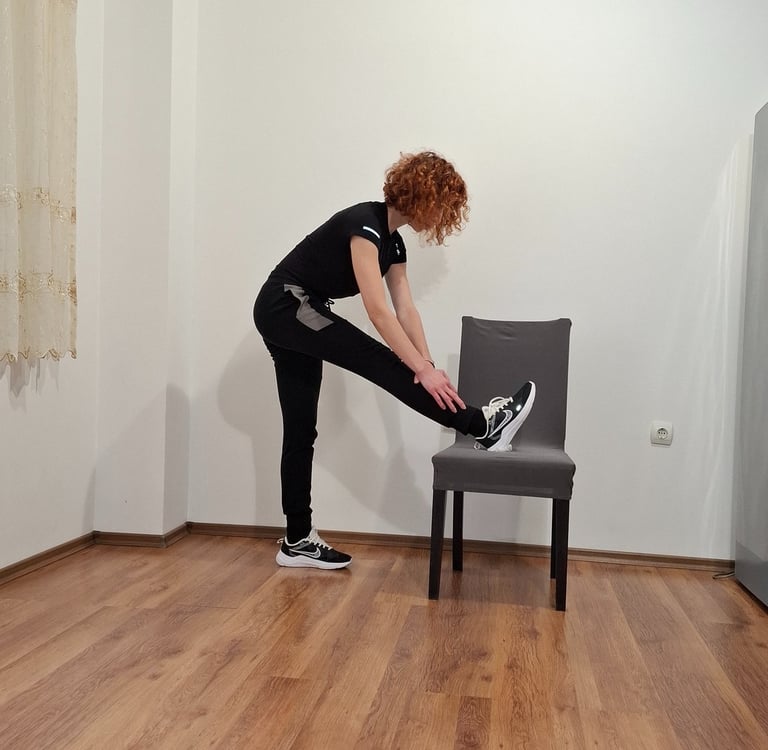
2. Elevated Hamstring Stretch (Using a Chair)
This variation provides extra support and allows for a deeper stretch, especially for those with limited flexibility.
How to Perform:
Stand in front of a sturdy chair or something lower, like a step
Place one leg on the chair, keeping the knee straight and toes pointing upward.
Lean forward gently at the hips, reaching toward your elevated foot.
Hold for 20-30 seconds, then switch legs.
Repeat 2-3 times per leg.
Tips:
Keep your back straight and avoid bouncing.
Adjust the chair height based on your flexibility; a lower surface works well for beginners.
Which Stretch Should You Choose?
Supine Hamstring Stretch: Ideal for beginners, people with back issues, or those needing a gentler approach.
Standing Hamstring Stretch: A quick option that can be done anywhere without equipment.
Elevated Hamstring Stretch: Best for a deeper stretch with more control.
Incorporating these variations into your routine ensures you can stretch your hamstrings effectively, no matter your level of flexibility or environment.
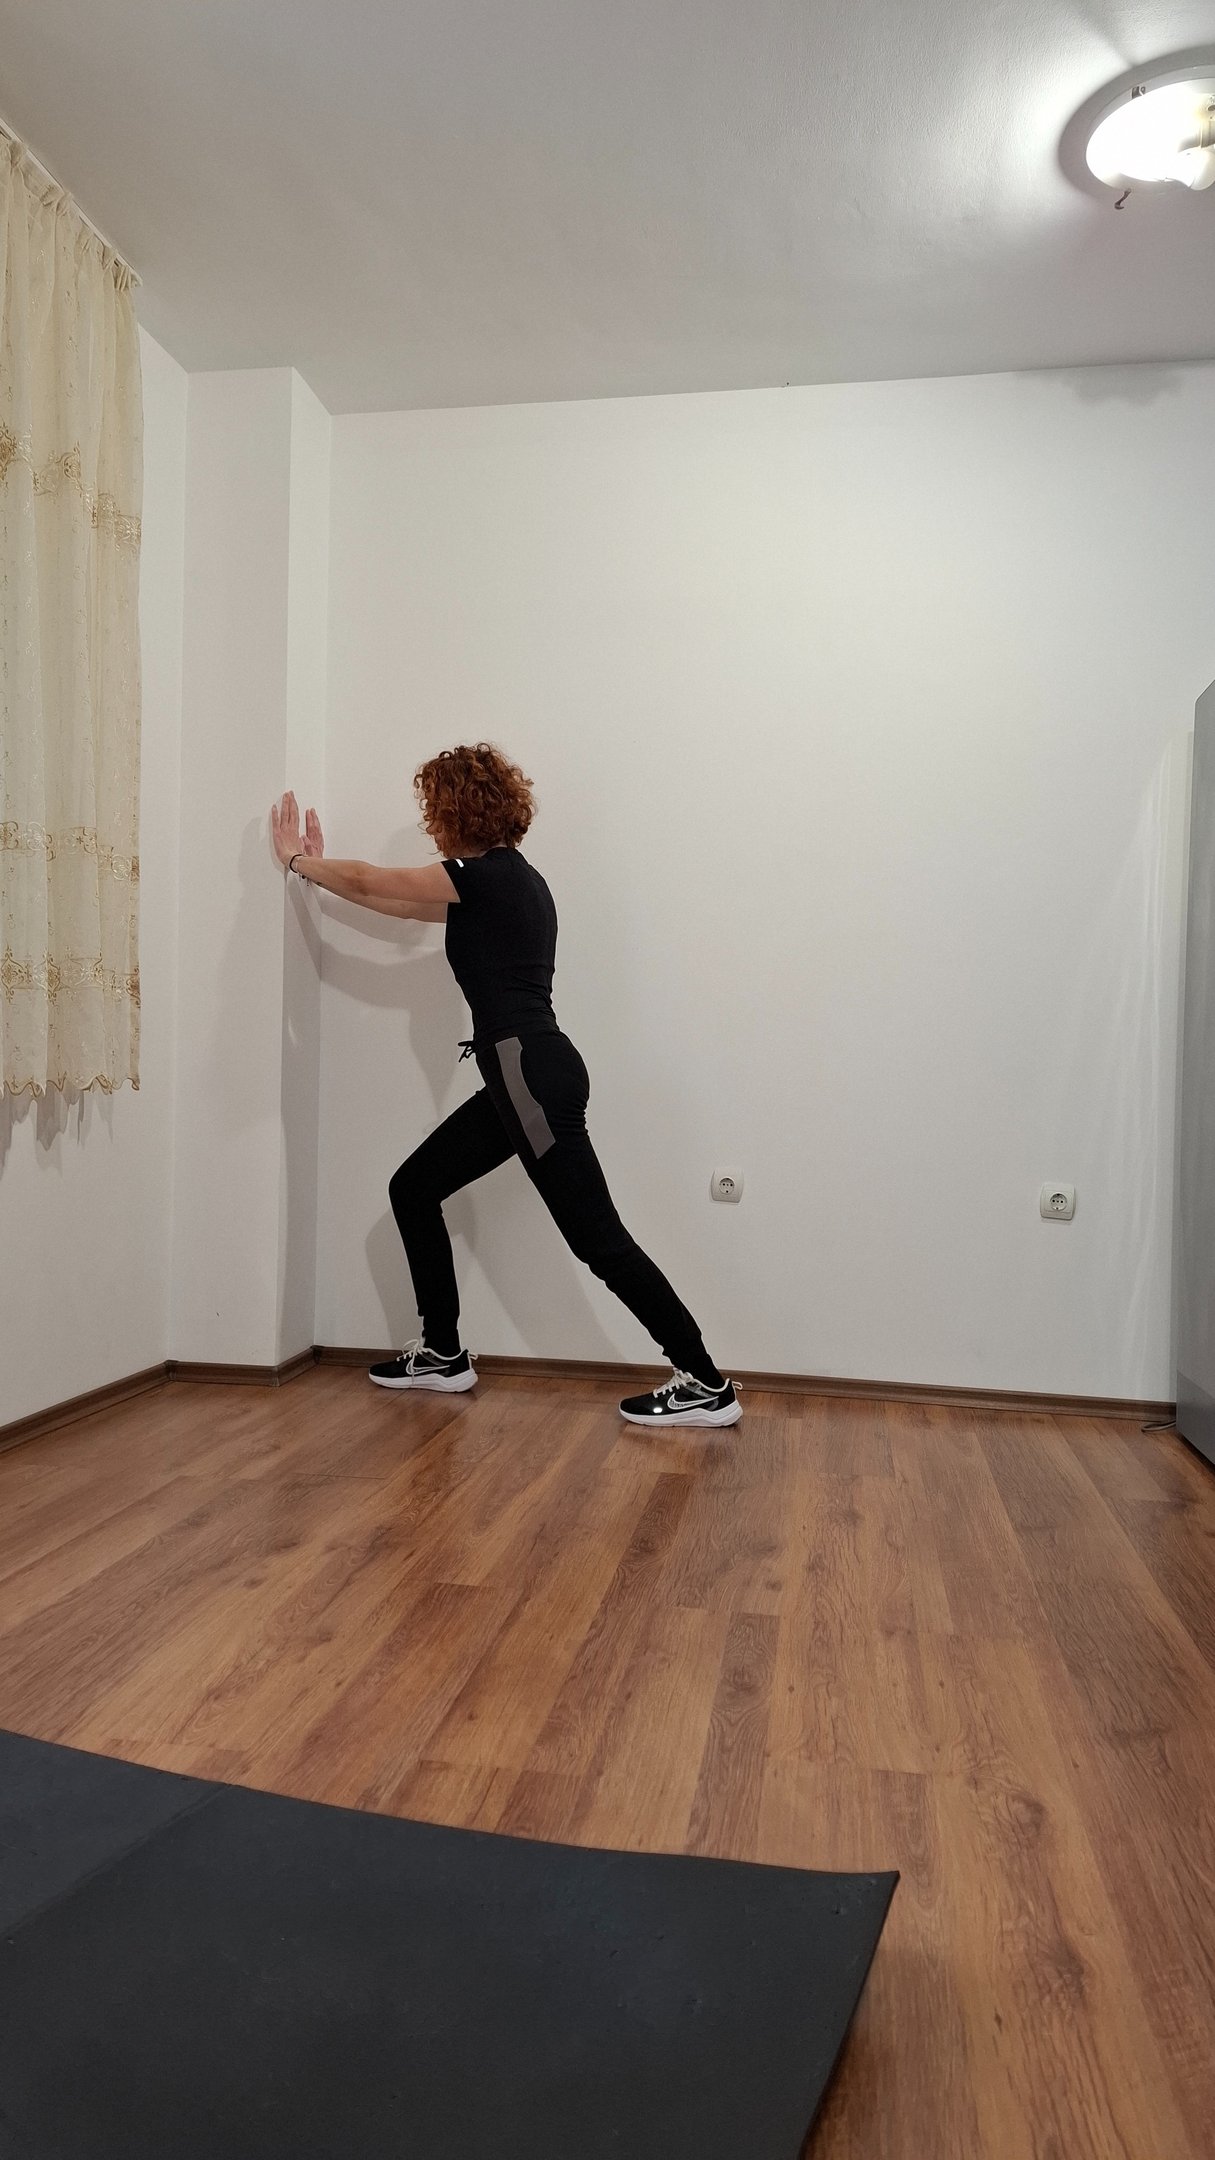
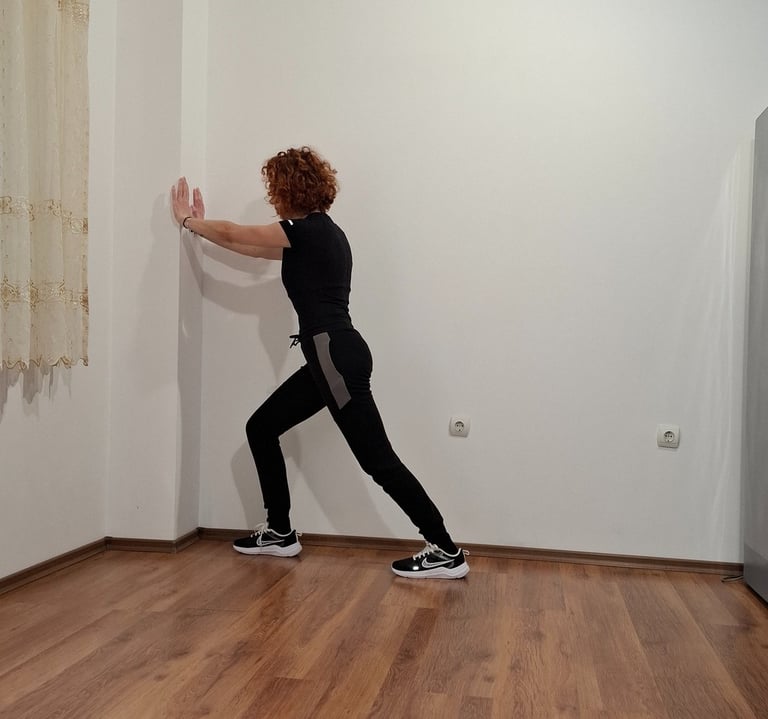
C. Calf Stretch
The calf muscles are connected to the knee joint, and tightness in this area can contribute to knee pain.
How to Perform:
Stand facing a wall with your hands pressed against it at shoulder height.
Step one leg back, keeping the heel flat and the back leg straight.
Bend your front knee while keeping your back leg extended to feel a stretch in the calf of the back leg.
Hold for 20-30 seconds, then switch legs.
Repeat 2-3 times on each side.
D. IT Band Stretch (Standing Side Stretch)
The iliotibial (IT) band runs along the outside of the thigh and can become tight, leading to knee pain. This stretch targets both the IT band and hip muscles.
How to Perform:
Stand tall and cross your right leg behind your left.
Lean your upper body to the left side until you feel a stretch along the outer right thigh.
Hold for 20-30 seconds, then switch sides.
Repeat 2-3 times on each side.
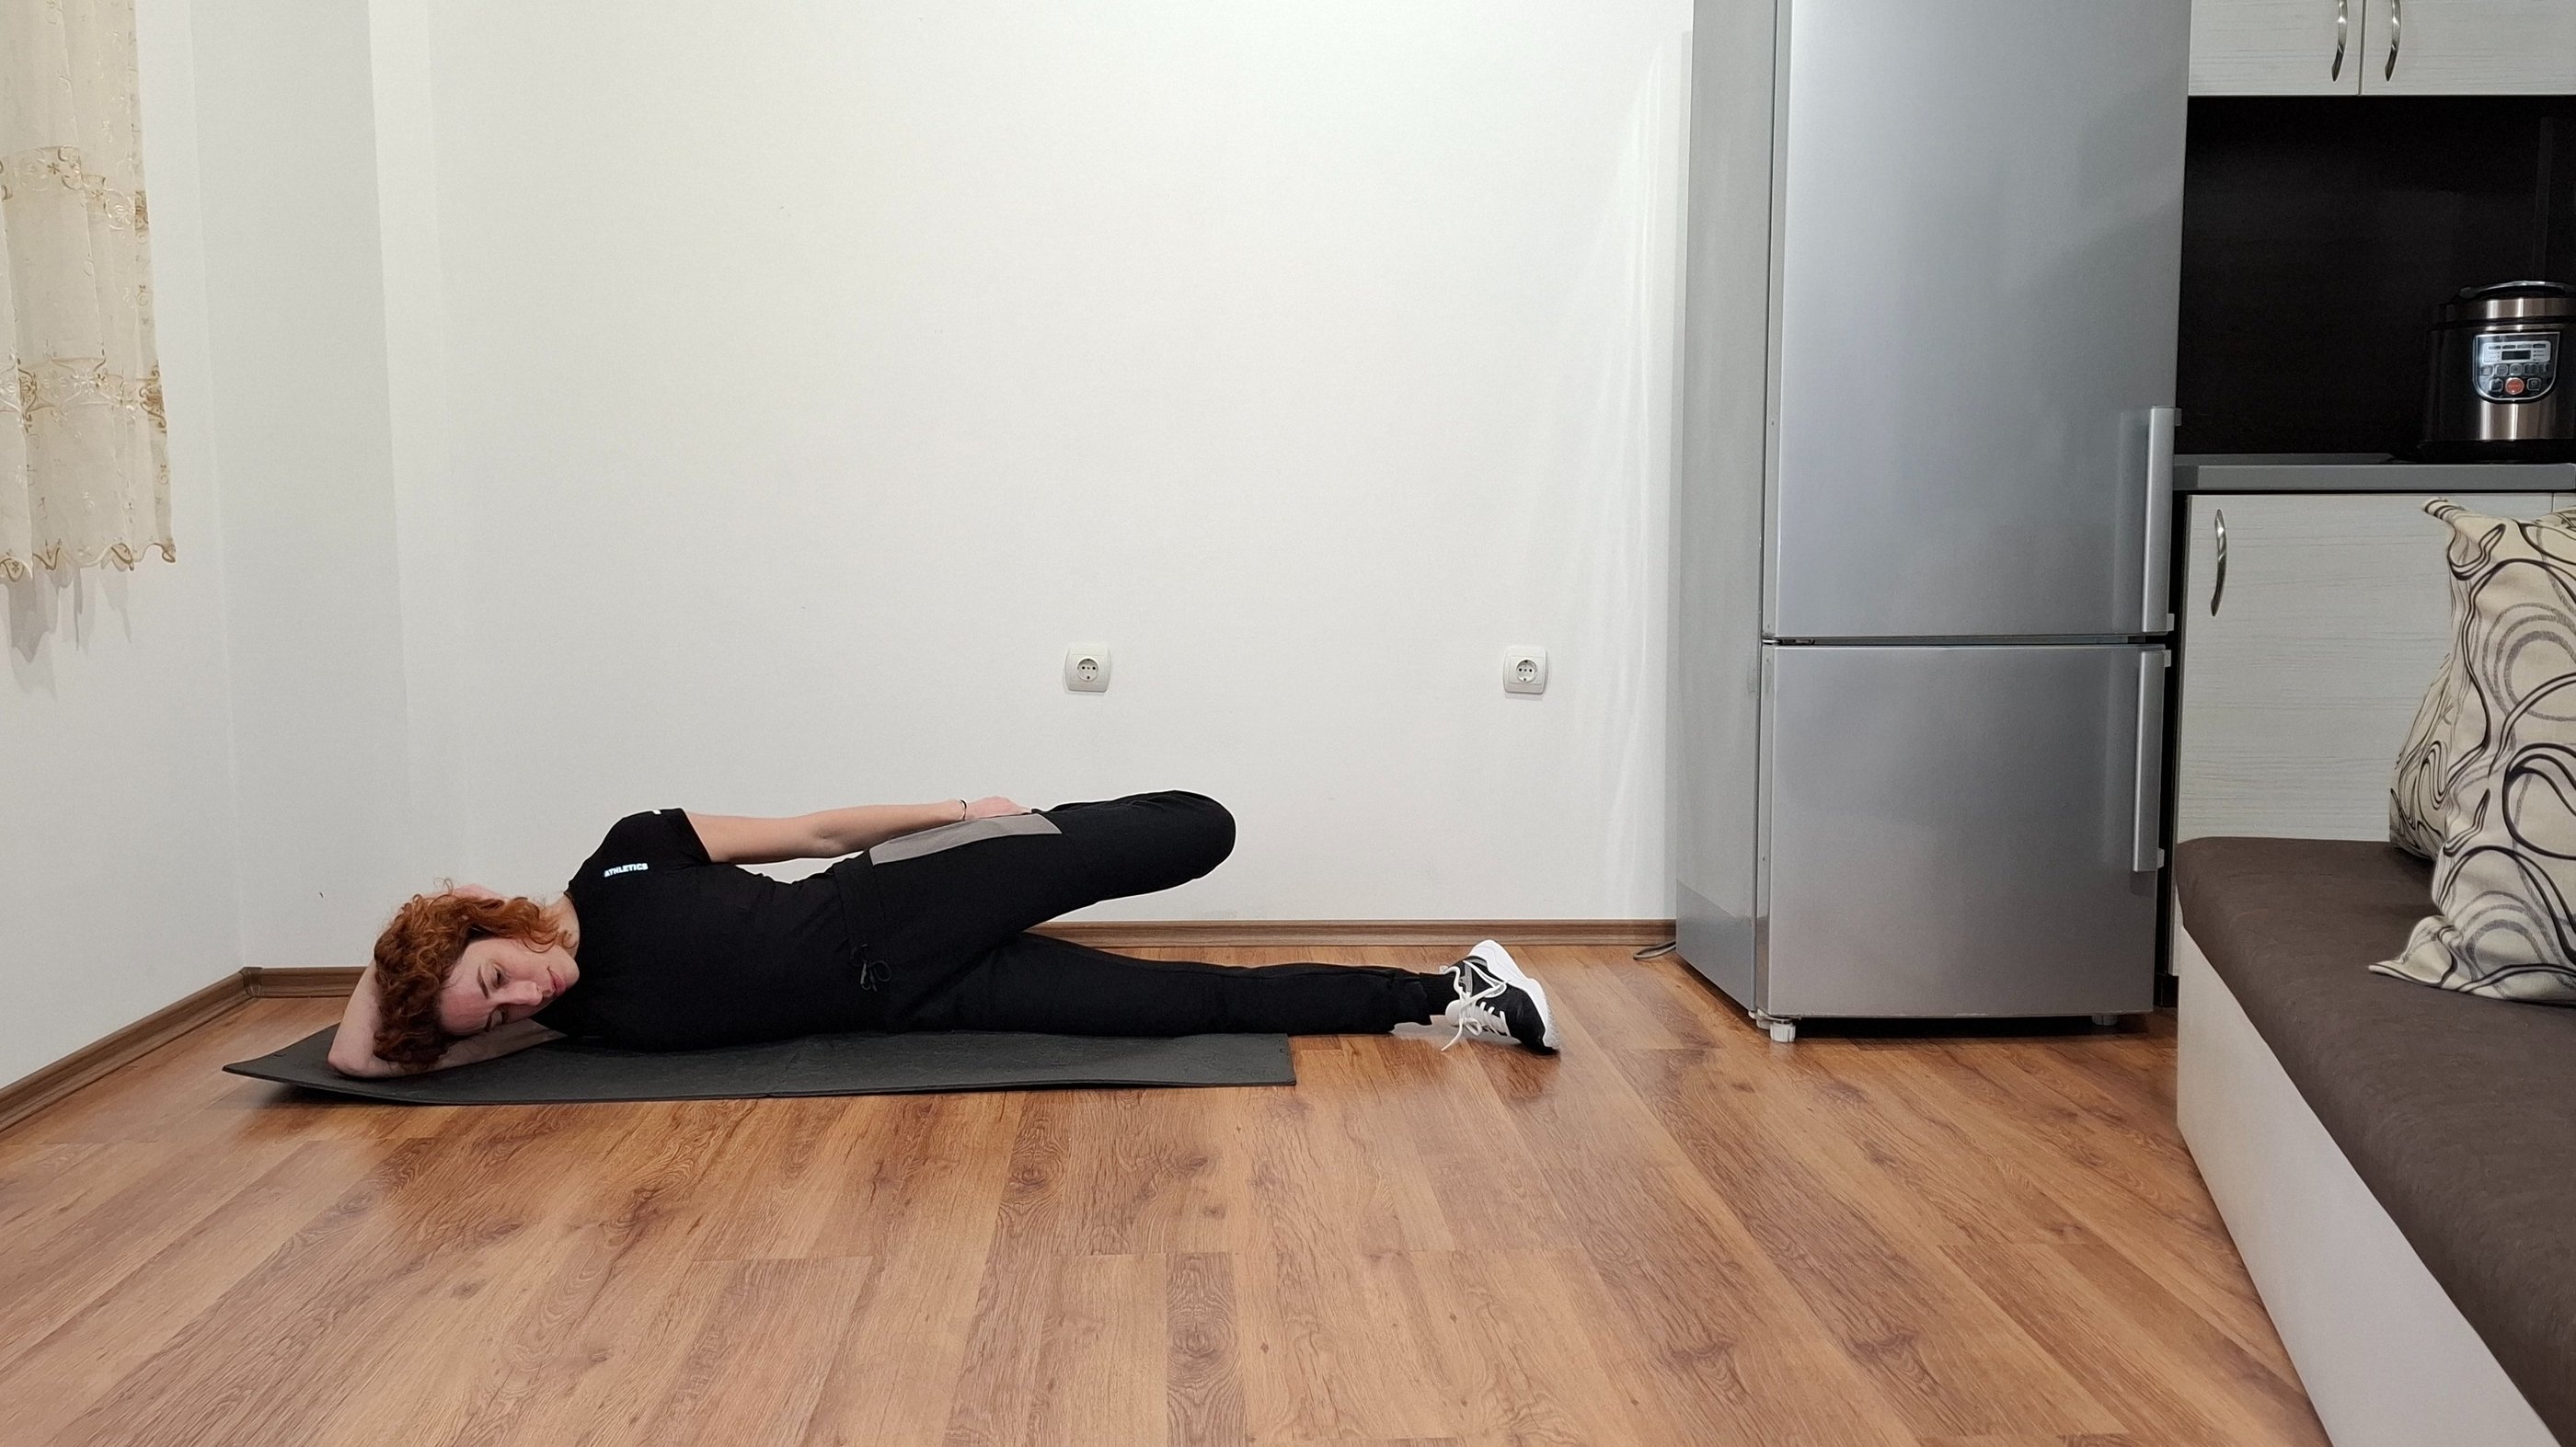
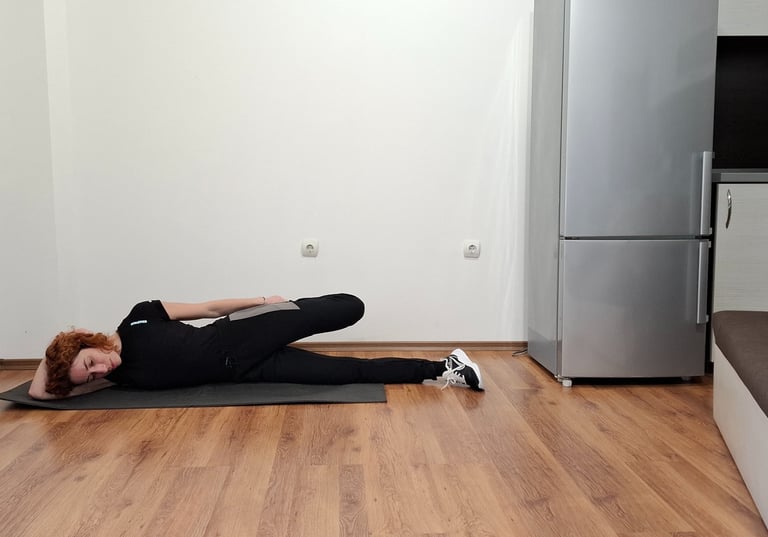
E. Figure 4 Stretch
The Figure 4 Stretch is an excellent way to target the IT band, glutes, and hip muscles, helping to alleviate tightness and improve mobility. This stretch is versatile and can be performed lying down, seated, or even standing.
How to Perform the Figure 4 Stretch (Lying Down)
Set Up:
Lie flat on your back on a yoga mat or soft surface.
Bend both knees and place your feet flat on the floor.
Cross the Leg:
Cross your right ankle over your left thigh, just above the knee, forming a “4” shape with your legs.
Deepen the Stretch:
Reach through your legs and grasp the back of your left thigh with both hands.
Gently pull your left leg toward your chest, feeling the stretch in your right hip and glutes.
Hold the Stretch:
Relax your shoulders and keep your head and back flat on the floor.
Hold the stretch for 20-30 seconds, breathing deeply.
Switch Sides:
Slowly release your legs and repeat the stretch on the opposite side.

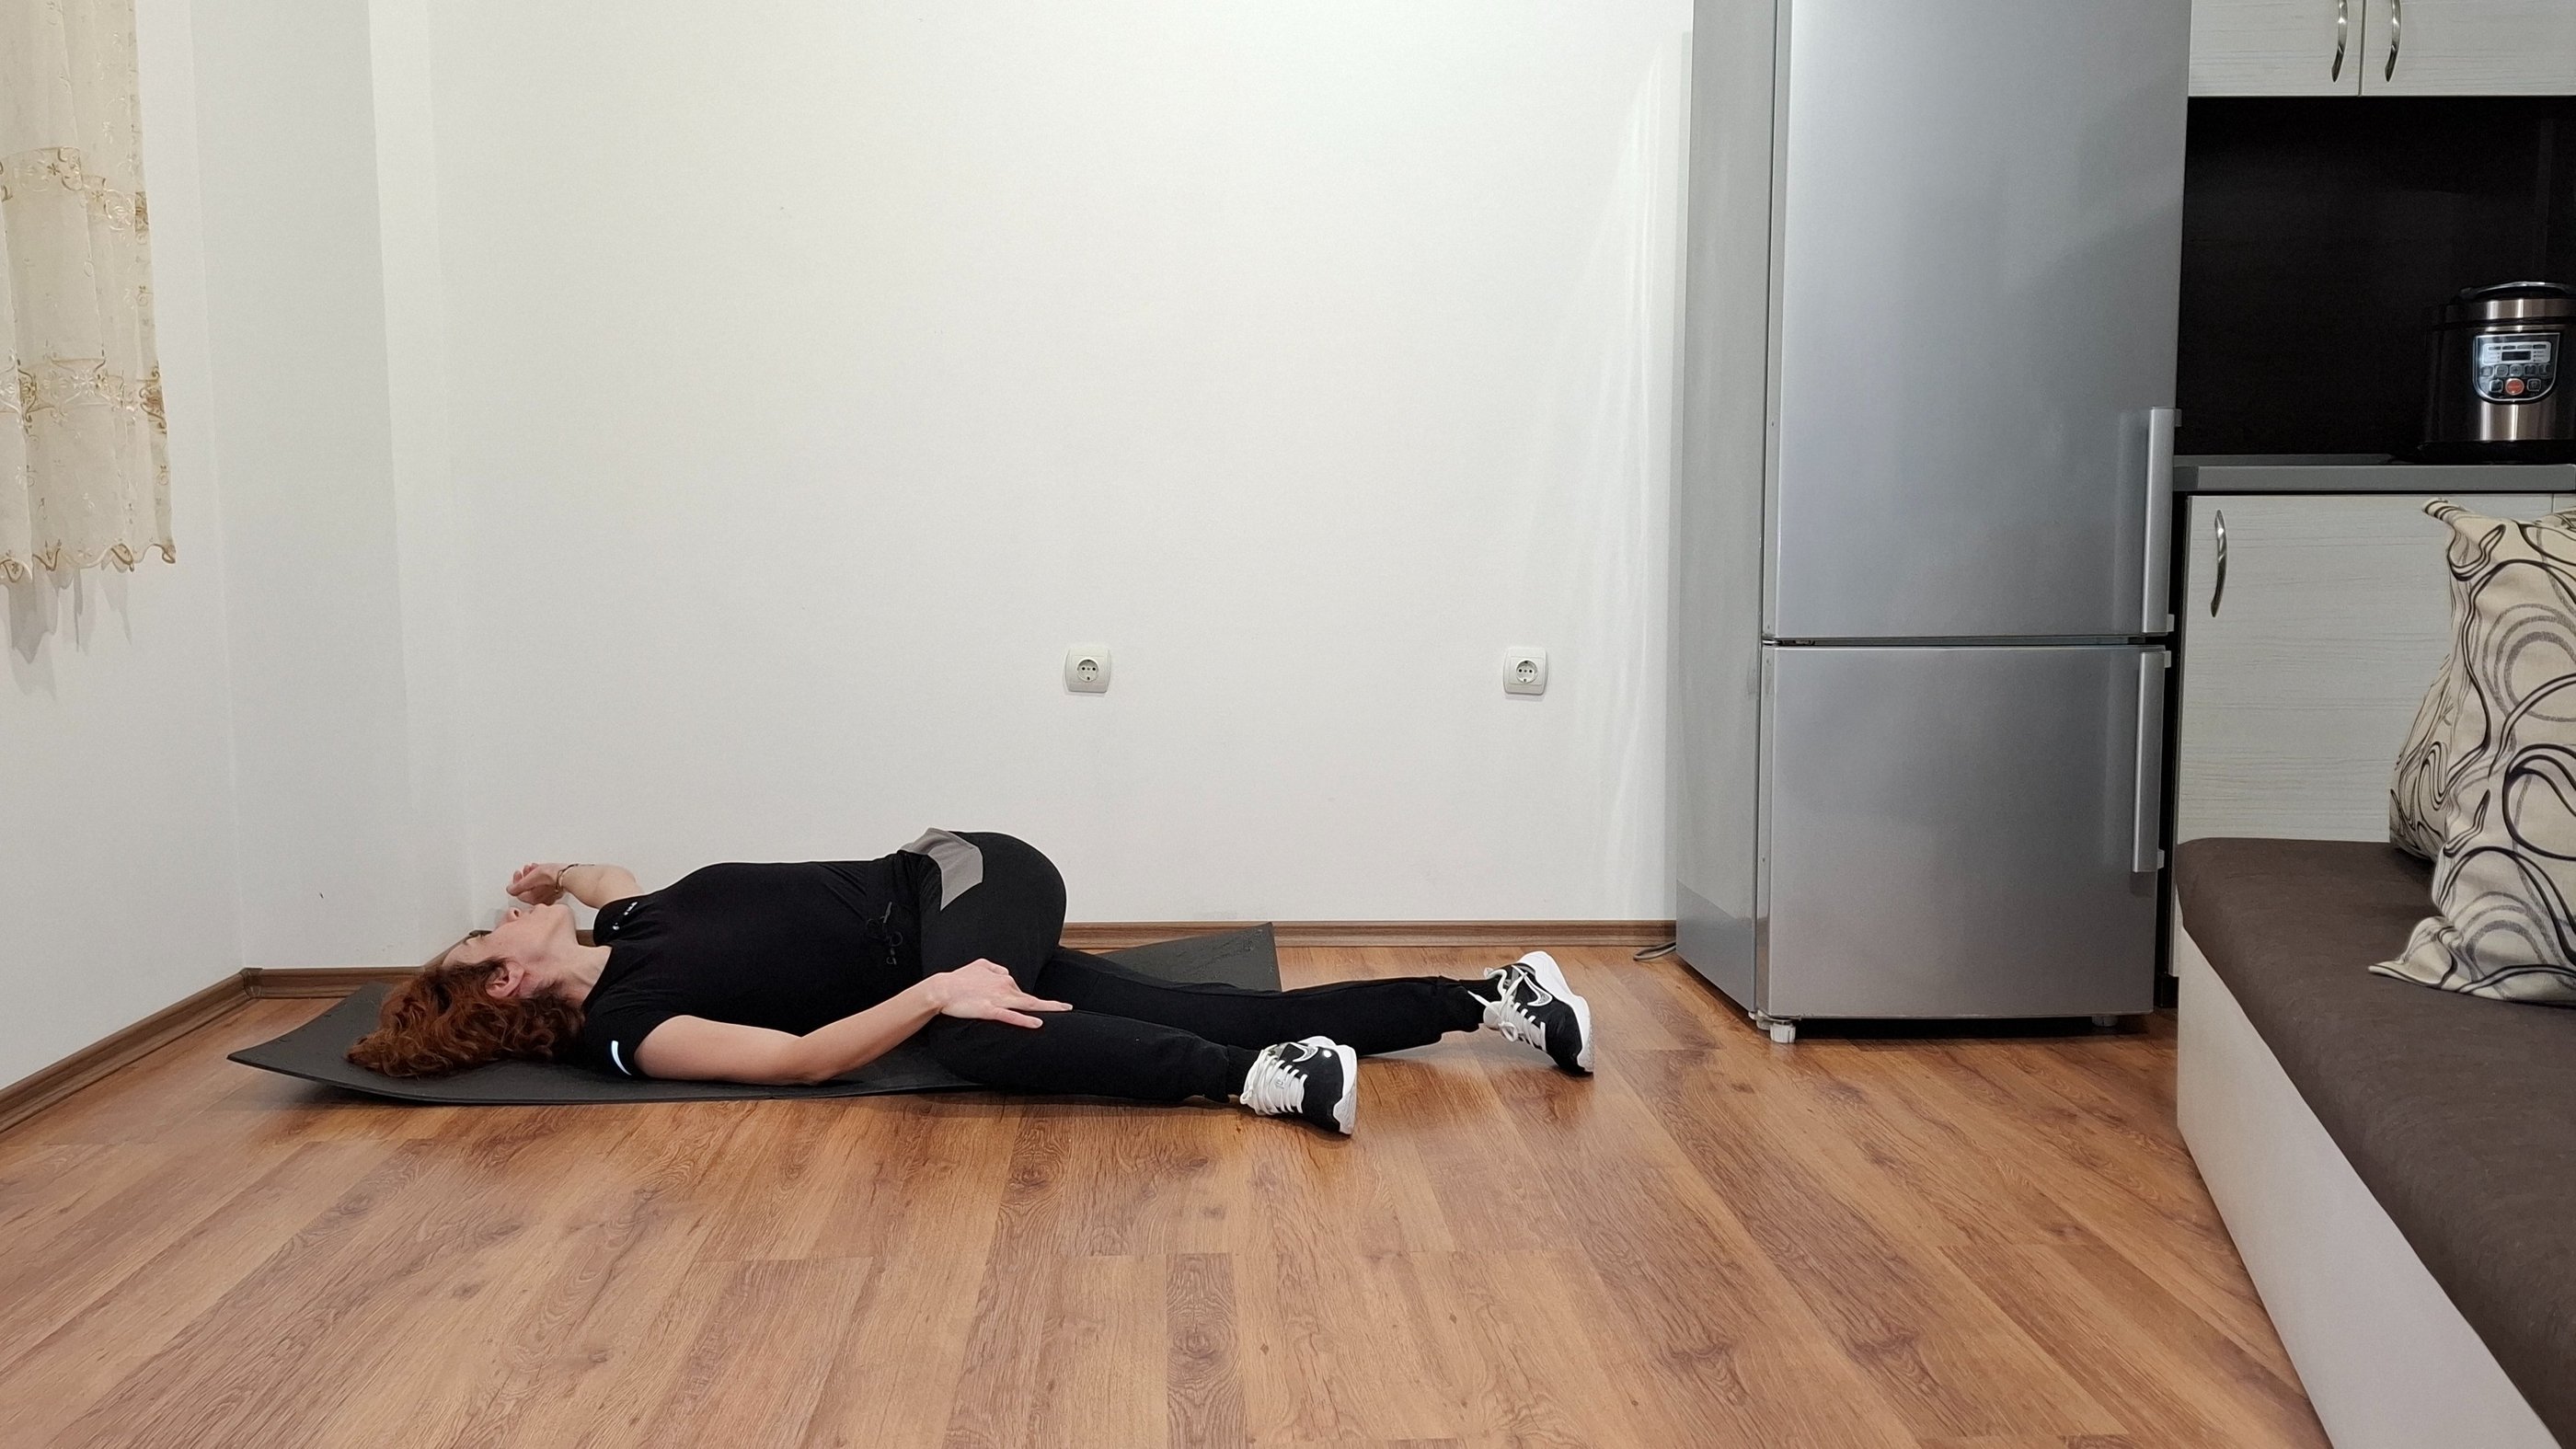
E. Adductor Stretch-Frog Stretch
The frog stretch is a highly effective way to target the adductor muscles (inner thighs) and improve hip flexibility. It can be performed in an upright position or with a forward lean for a deeper stretch, depending on your comfort and flexibility level.
How to Perform the Frog Stretch:
Start Position:
Begin on all fours with your hands under your shoulders and knees under your hips.
Spread your knees apart as wide as is comfortable, keeping your feet in line with your knees and your toes pointing outward.
Upright Position:
Keep your back straight and your torso upright.
Rest your hands on the floor for support, or place them on your thighs if you can balance without discomfort.
Deepen the Stretch (Leaning Forward):
Gradually lower your elbows to the floor if your flexibility allows, or keep your hands on the floor.
Push your hips slightly back toward your heels to intensify the stretch.
Hold the Stretch:
Maintain the position for 20-30 seconds while breathing deeply.
Avoid forcing the stretch or going past your comfort level.
Return to Start:
Slowly bring your knees back together to exit the stretch.
Tips for Proper Form:
Keep your spine neutral, avoiding rounding or arching your back.
Focus on spreading your knees rather than forcing your hips backward.
Use a padded surface or yoga mat to protect your knees.
Benefits of the Frog Stretch:
Deep Adductor Stretch: Targets the inner thighs and groin muscles effectively.
Improves Hip Flexibility: Enhances range of motion in the hips, which is crucial for activities like squatting or running.
Relieves Tension: Alleviates tightness in the groin and inner thighs caused by prolonged sitting or overuse.
Customizable: Suitable for beginners and advanced individuals, with options to stay upright or lean forward for a deeper stretch.
Incorporating the frog stretch into your routine 2-3 times a week can greatly enhance your lower body mobility and prevent inner thigh or groin injuries. It’s particularly beneficial for athletes, dancers, or anyone looking to improve hip flexibility.
Tips for Safe Knee Stretching
Always warm up before stretching to avoid injury. A light walk or gentle movements can prepare your muscles.
Avoid bouncing during stretches. Move slowly and hold each position.
Stretch within your comfort zone; pain is a sign to stop.
Perform stretches daily or at least 3-4 times per week for best results.
By incorporating these knee stretches along with the lower back stretches, you can effectively manage pain, improve flexibility, and strengthen the supporting muscles. Combine these strategies with light exercises and healthy habits to keep your knees strong and pain-free for the long term.
Stretching Before Bed: A Simple Way to Relieve Tension
You don’t always need a yoga mat or a designated workout space to reap the benefits of stretching. These stretches can be performed right on your bed, making it an easy and practical solution for anyone pressed for time or looking for a gentle way to unwind. Even just 3 minutes before bedtime can make a big difference in reducing muscle tension and improving flexibility.
Why Stretch on the Bed?
Convenience: You can incorporate it into your nighttime routine without needing special equipment or space.
Gentle Support: A bed provides a softer surface, which can feel more comfortable for people with joint sensitivities or back issues.
Relaxation: Stretching before bed helps release physical and mental tension, promoting better sleep.
How to Adapt These Stretches for Bed
Knee to Chest (Single and Double Leg)
Supine Twist
Cat Cow
Adductor Stretch-Frog Stretch
Figure 4 Stretch
Supine Hamstring Stretch (Holding Leg Up)
Perform the same steps as described earlier, but lie on your bed instead of the floor.
Ensure you have enough space to comfortably lower your leg to the side without restrictions for Adductor Stretch.
The Power of Just 3 Minutes
Taking 3 minutes to stretch before bedtime can be enough to improve blood flow, release muscle tension, and prepare your body for restful sleep.
If you struggle to find time during the day, this simple practice is an excellent alternative that fits into even the busiest schedules.
Stretching on your bed may not provide the same stability as a floor surface, but it’s better than nothing and a fantastic way to stay consistent with your routine. Over time, these small efforts add up, contributing to better flexibility, reduced pain, and overall well-being.
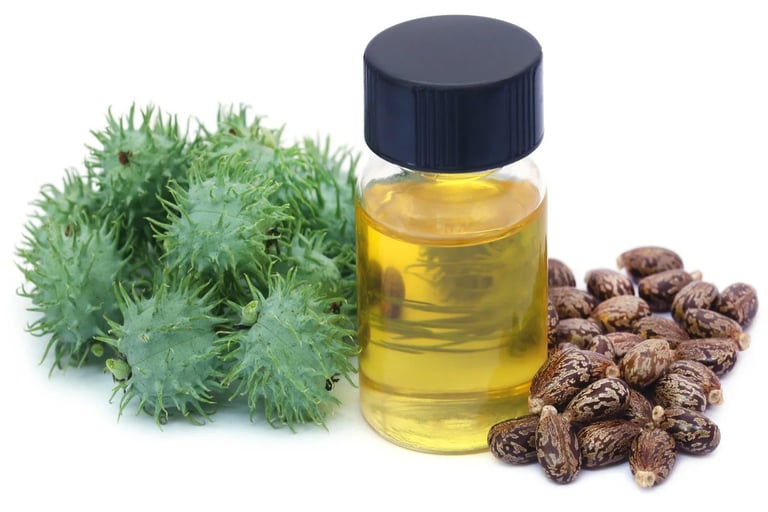
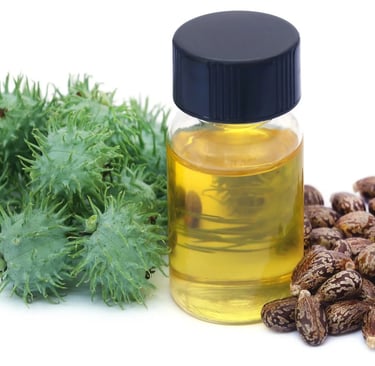
3. Massage Therapy for Knee Pain
Massage therapy is an effective method to relieve knee pain, reduce inflammation, and improve circulation. One of the most beneficial natural remedies for knee pain is castor oil massage.
Why Castor Oil?
Castor oil is rich in ricinoleic acid, which has anti-inflammatory and analgesic properties. When massaged around the knees, it penetrates deeply to:
Reduce swelling and stiffness.
Improve blood flow to the affected area.
Relieve pain naturally without side effects.
How to Massage with Castor Oil:
Put a small amount of castor oil in your hands or a bowl.
Gently massage the oil into around knee in circular motions.
Massaging upwards from your ankle to your knee and then from your knee to your hip with your fingertips will help relieve tight muscles.
Cover the area with a warm cloth or heating pad for 10-15 minutes for better absorption.
Repeat this process 2-3 times a week.
4. The Benefits of Compressing with Boiled Water and Vinegar for Knee Pain
When it comes to quick and practical remedies for knee pain, compressing with a mixture of boiled water and vinegar stands out as an effective option. This traditional remedy has been used for centuries to alleviate pain and inflammation, providing instant relief.
How It Works
The combination of heat from boiled water and the natural anti-inflammatory and antimicrobial properties of vinegar helps to:
Increase Blood Flow: Heat dilates blood vessels, improving circulation to the knee joint, which reduces stiffness and promotes healing.
Relax Stiff Muscles and Tendons: The warmth soothes tight muscles and tendons surrounding the knee.
Reduce Swelling: Vinegar contains acetic acid, which helps reduce inflammation and swelling in the affected area.
Alleviate Pain Naturally: The heat and vinegar combination provides soothing relief without relying on medications.
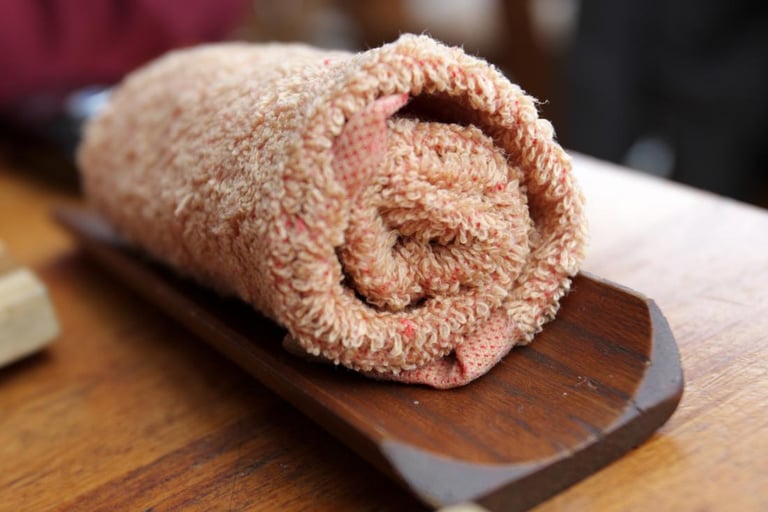
How to Use Boiled Water and Vinegar Compress
What You’ll Need:
1 cup of water
2-3 tablespoons of vinegar (apple cider vinegar or white vinegar)
A clean towel or cloth
Steps to Follow:
Boil the water and allow it to cool slightly so it’s warm but not scalding.
Mix the vinegar into the boiled water.
Soak a clean towel or cloth in the mixture and wring out the excess.
Place the warm compress directly on the affected knee.
Leave it on for 10-15 minutes, re-soaking and wringing the cloth as needed to maintain warmth.
Repeat 2-3 times a day for best results.
Tips for Safe Application:
Always test the temperature of the compress to ensure it’s not too hot to avoid burns.
Use a soft cloth to prevent skin irritation, especially for sensitive skin.
For added benefits, you can add a few drops of essential oils like lavender or eucalyptus to the mixture for relaxation and enhanced pain relief.
Additional Benefits of Vinegar in Pain Relief
Detoxifying Properties: Vinegar is known for its ability to draw out toxins from the skin, which may contribute to reducing inflammation.
Improved Skin Health: The antimicrobial properties of vinegar keep the skin clean and prevent infections in case of any cuts or abrasions around the knee.
Incorporating this quick and practical remedy into your routine, along with stretching, massage, and strengthening exercises, provides a well-rounded approach to managing knee pain effectively. Spending just 1 minute a day addressing your pain can lead to significant relief, when done consistently for 2-3 weeks. It’s a simple yet powerful tool for immediate relief and long-term joint health. Or you can choose to continue living with the discomfort. The choice is yours.
1. Best Stretches for Lower Back Pain
2. Stretching Exercises for Knee Pain Relief
3. Massage Therapy for Knee Pain
4. The Benefits of Compressing with Boiled Water and Vinegar for Knee Pain
5. Simple Exercises to Strengthen Knees and Lower Back
5. Simple Exercises to Strengthen Knees and Lower Back
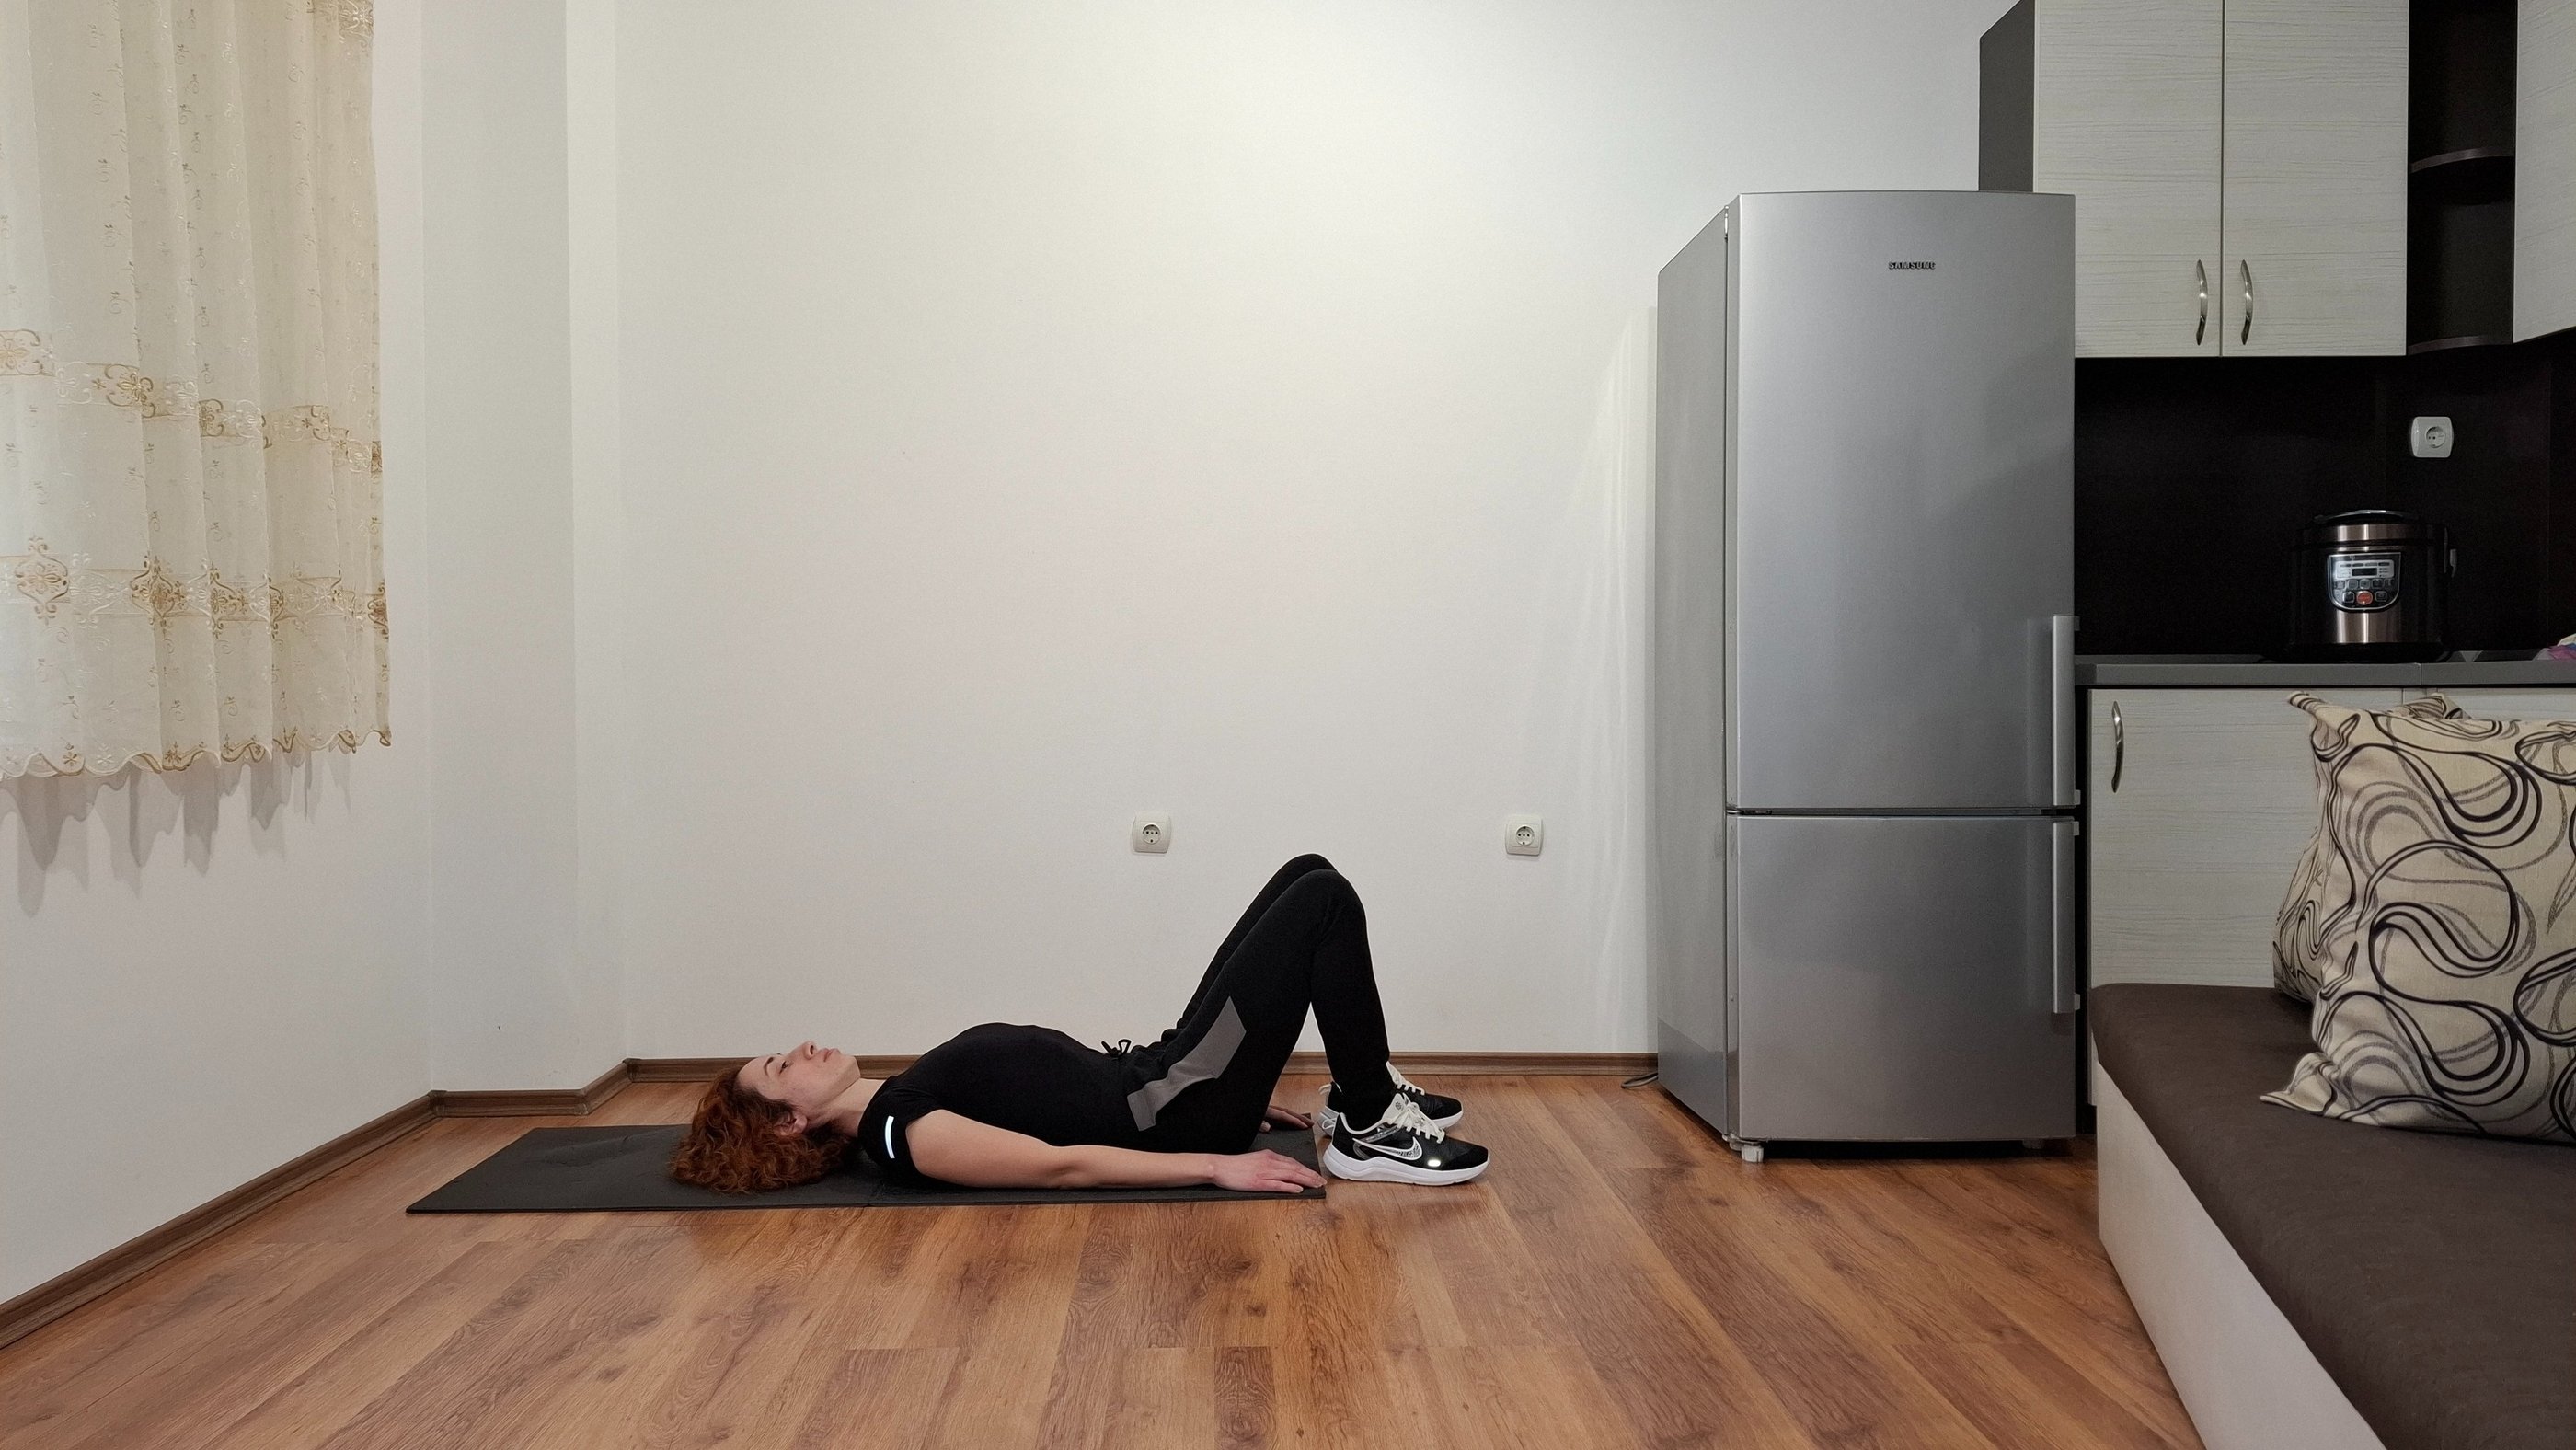
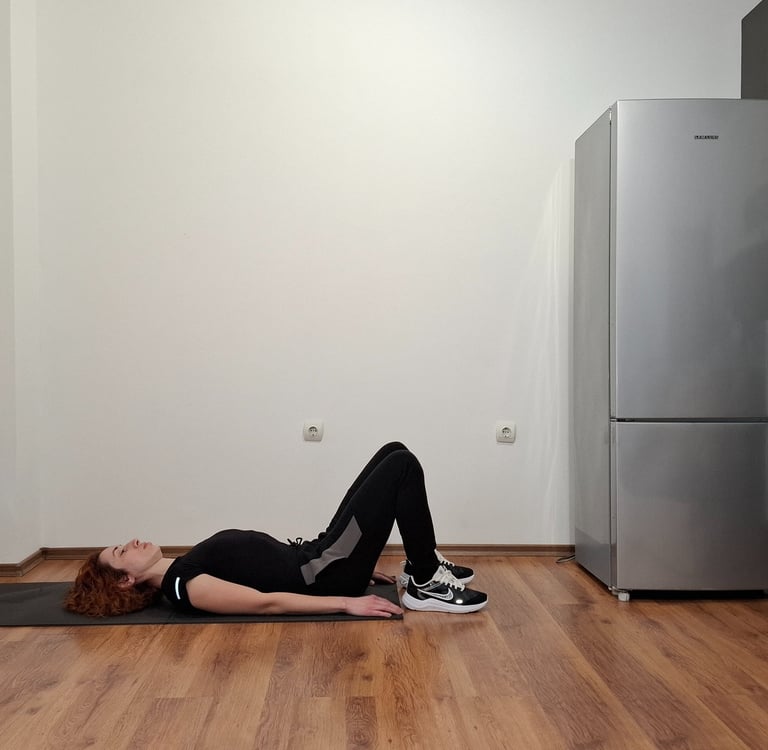
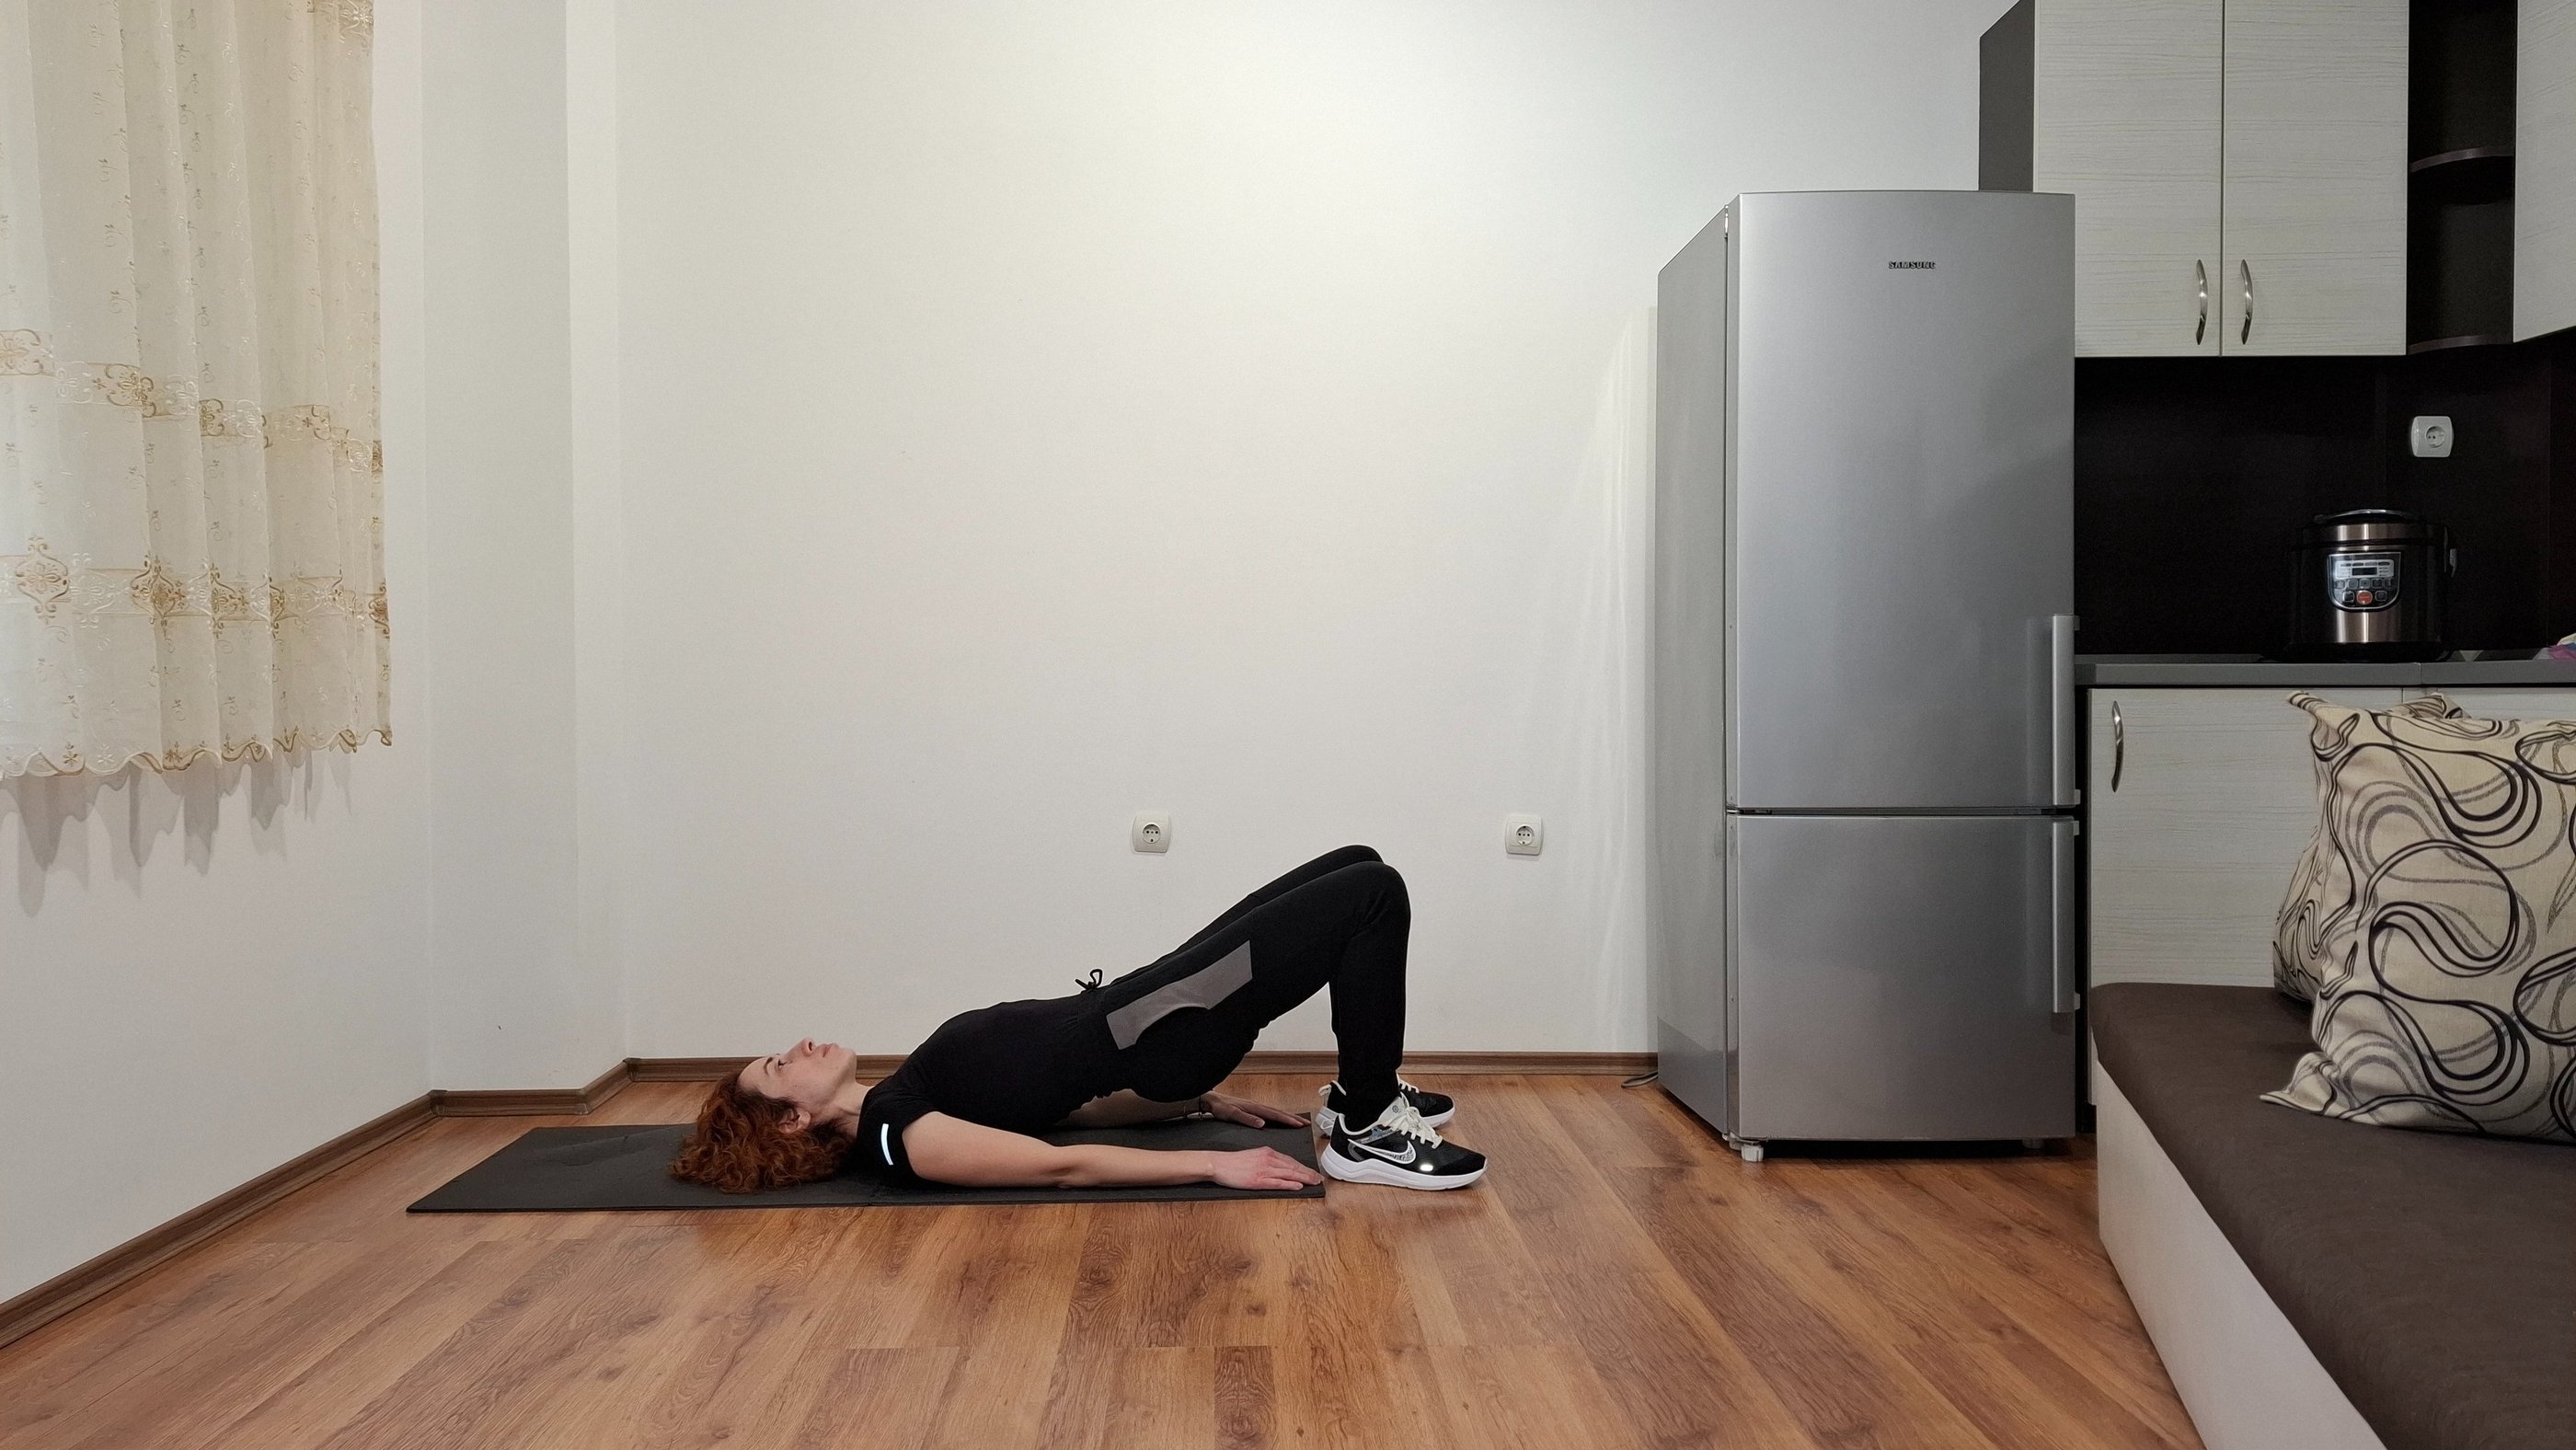
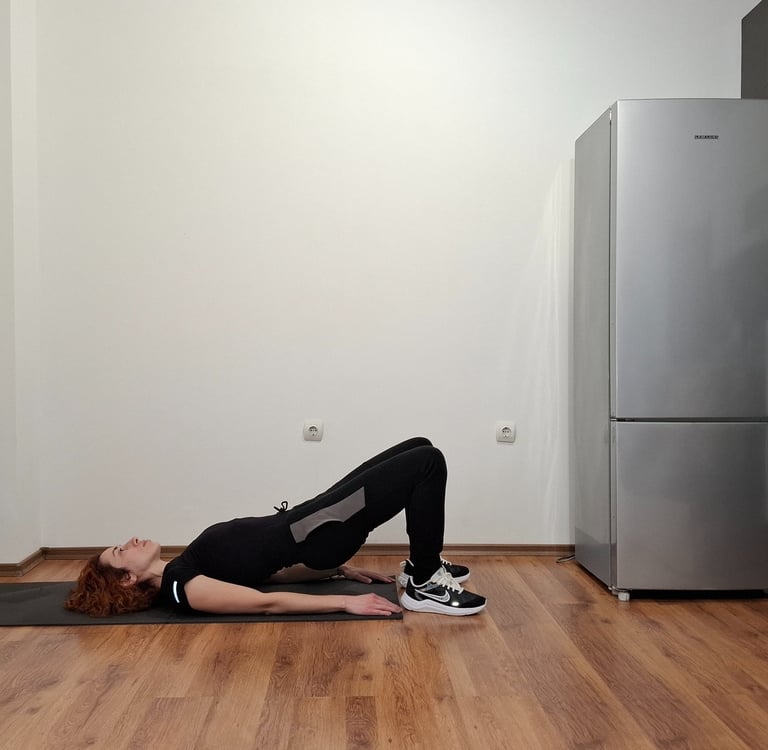
A. Bridge Pose (Glute Bridge)
This exercise strengthens the glutes, hamstrings, and lower back muscles while stabilizing the knees.
How to Perform:
Lie on your back with knees bent and feet flat on the floor, hip-width apart.
Tighten your core, squeeze your glutes, and lift your hips off the ground.
Hold for 5-10 seconds, then slowly lower down.
Repeat 10-12 times for 2-3 sets.
How to Perform the Figure 4 Stretch (Seated Version)
Sit on a sturdy chair with both feet flat on the floor.
Cross your right ankle over your left thigh, forming a “4” shape.
Gently press down on your right knee with your hand to deepen the stretch.
Hold the position for 20-30 seconds, keeping your back straight.
Repeat on the opposite side.
Benefits of the Figure 4 Stretch
Releases Tight Hips: Relieves tension in the hip muscles, including the piriformis, which can affect the IT band.
Improves Mobility: Enhances range of motion in the hips and pelvis.
Alleviates Pain: Eases discomfort caused by tight IT band and glutes, reducing strain on the knees and lower back.
Accessible: Can be modified to suit different fitness levels and performed almost anywhere.
This simple yet effective stretch is a great addition to your routine, particularly if you experience hip or knee discomfort. Performing it regularly can help reduce tightness and improve overall flexibility.
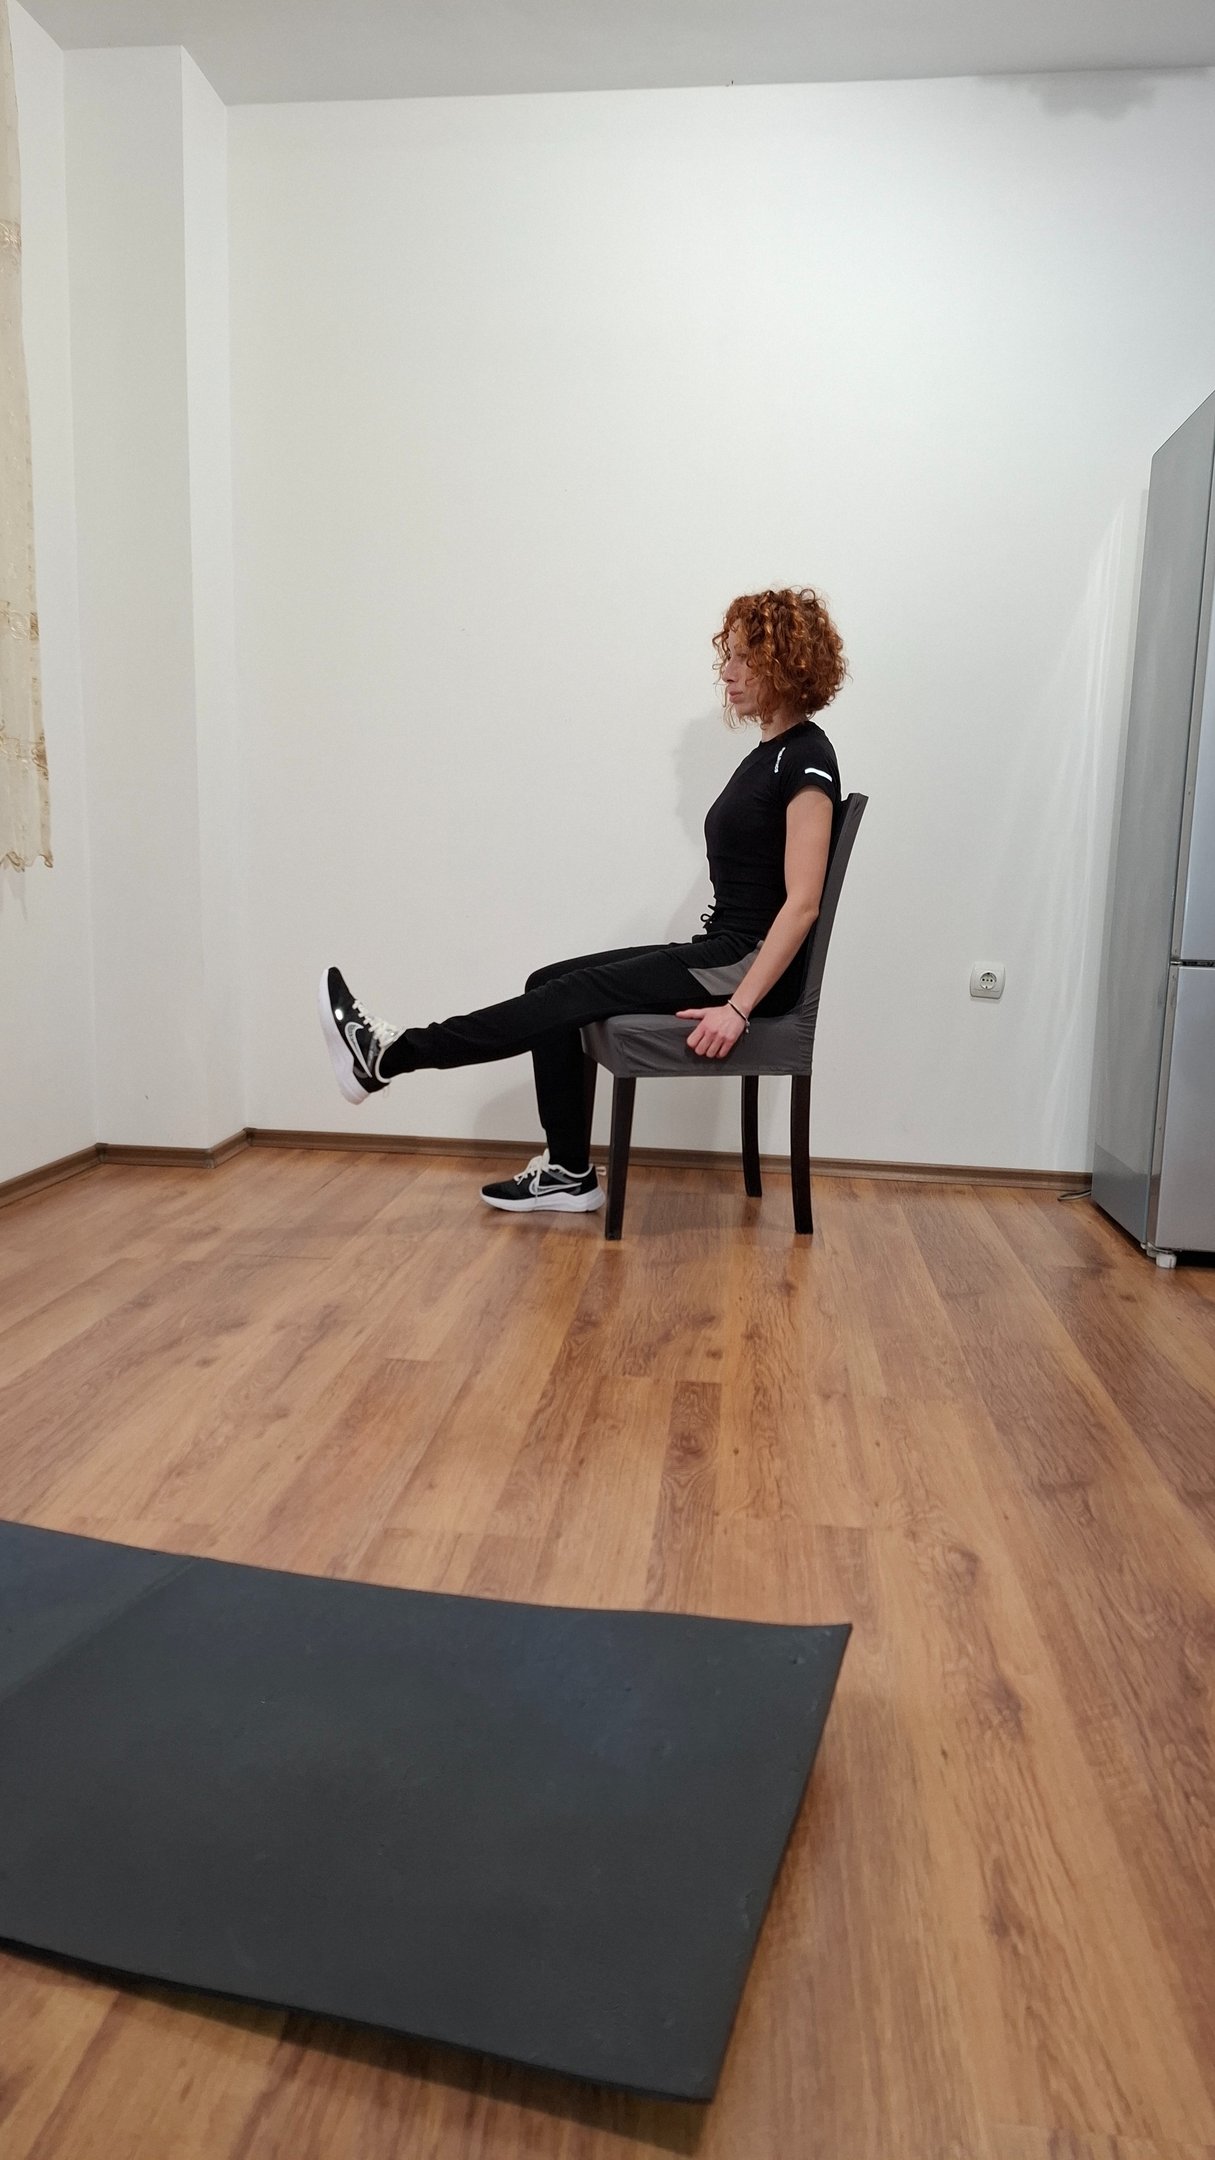
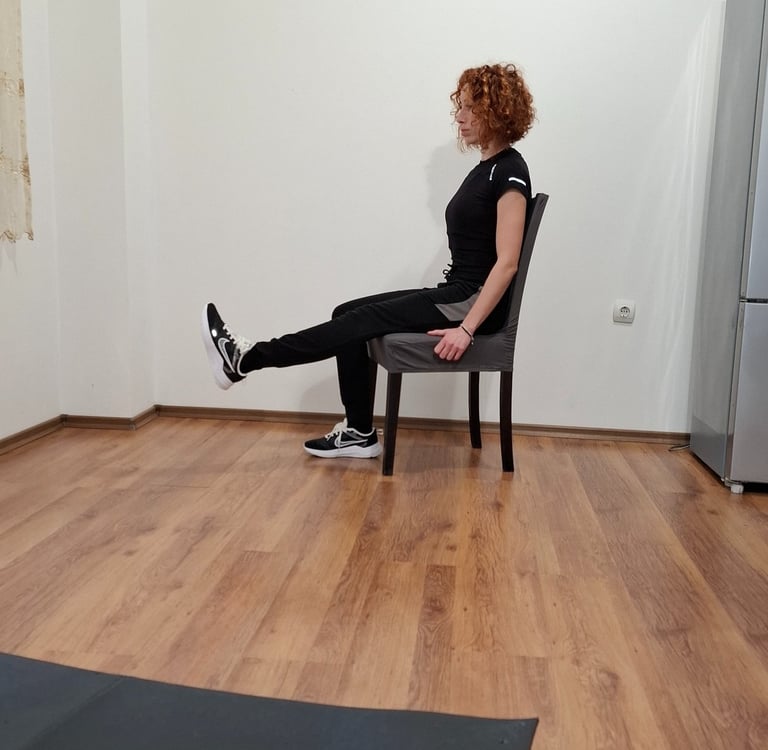
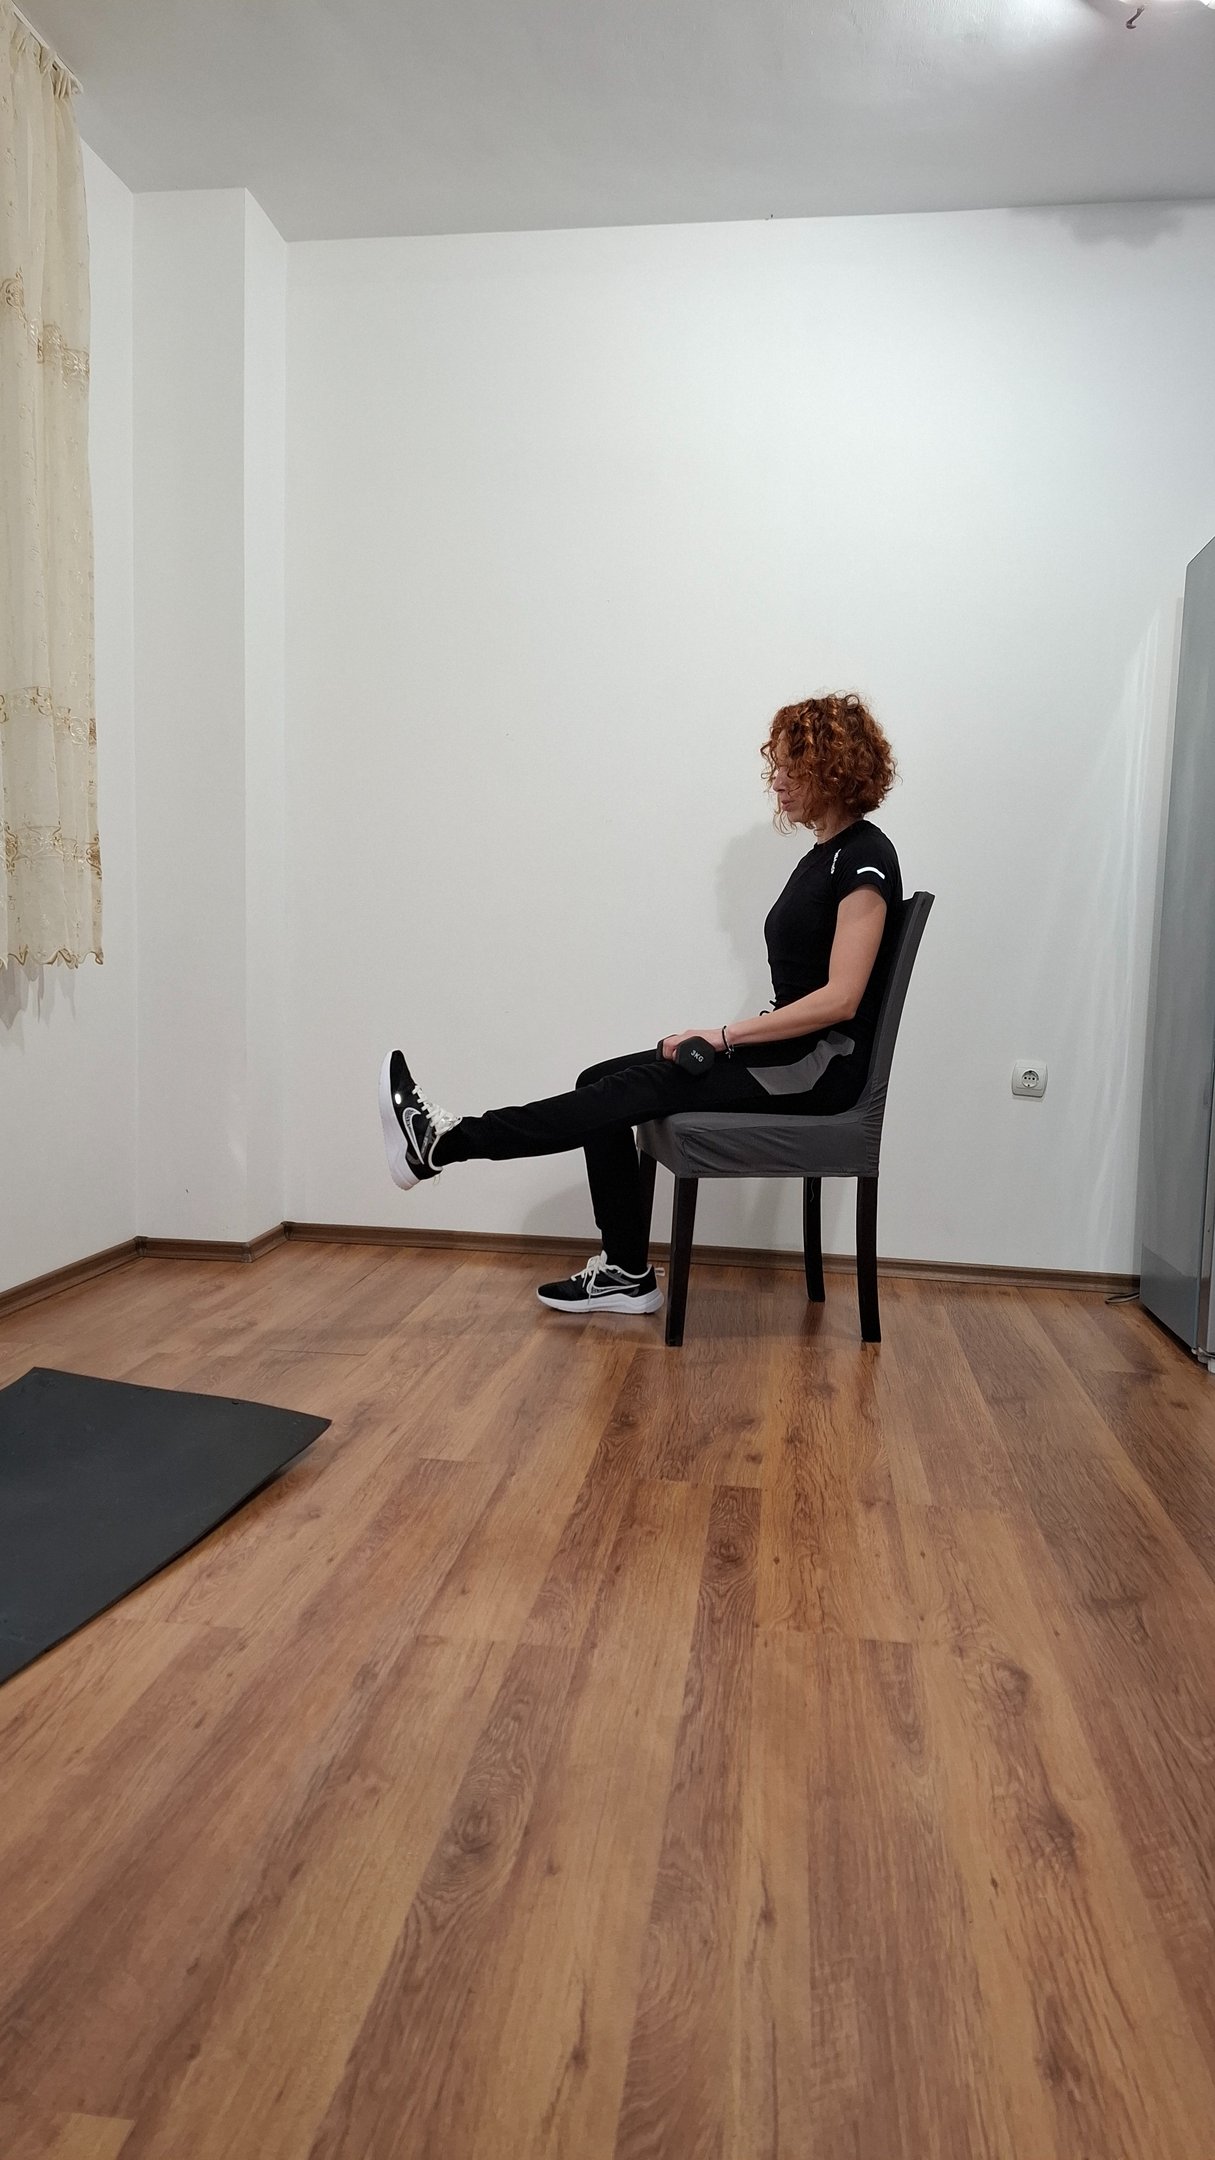
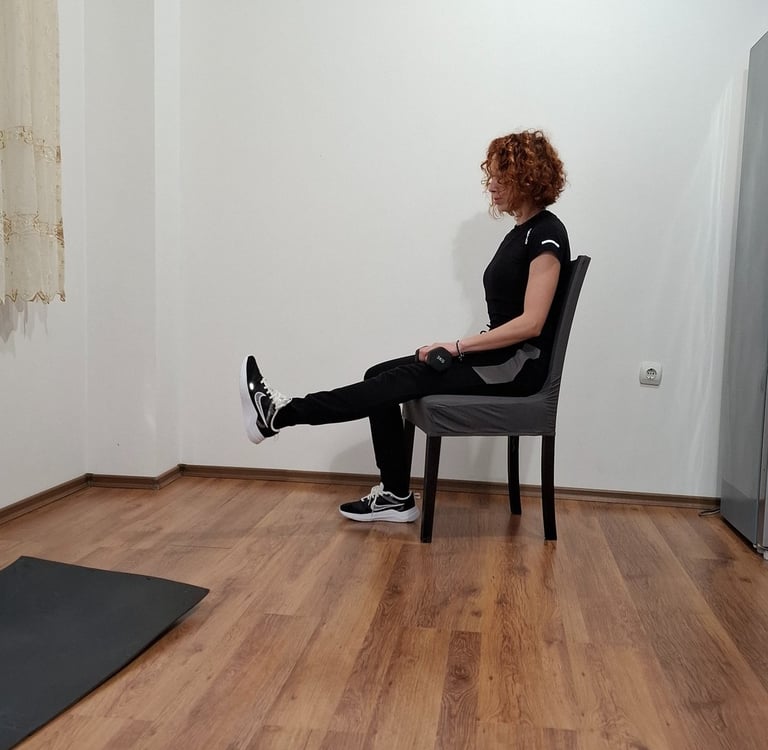
B. Leg Extension Exercise on a Chair for Quadriceps Strengthening
The leg extension exercise is an excellent way to target the quadriceps (the muscles on the front of your thigh), which are crucial for knee stability, walking, and other daily activities. This exercise can be done in a seated position, making it accessible and easy to perform at home or even at the office.
1. Double-Leg Extension (Using Body Weight, Band, or Dumbbells)
How to Perform:
Sit on a sturdy chair with your back straight and feet flat on the floor.
Place a resistance band around your ankles or rest a light dumbbell across your thighs, just above the knees.
Extend both legs straight out in front of you until they are parallel to the floor.
Hold the position for 1-2 seconds, focusing on engaging the quadriceps.
Slowly lower your legs back down to the starting position.
Repeat for 10-15 repetitions.
Tips:
Keep your core engaged and avoid leaning back.
Control the movement, especially when lowering your legs, to maximize muscle engagement.
If using a dumbbell, ensure it is secured on your thighs to avoid slipping.
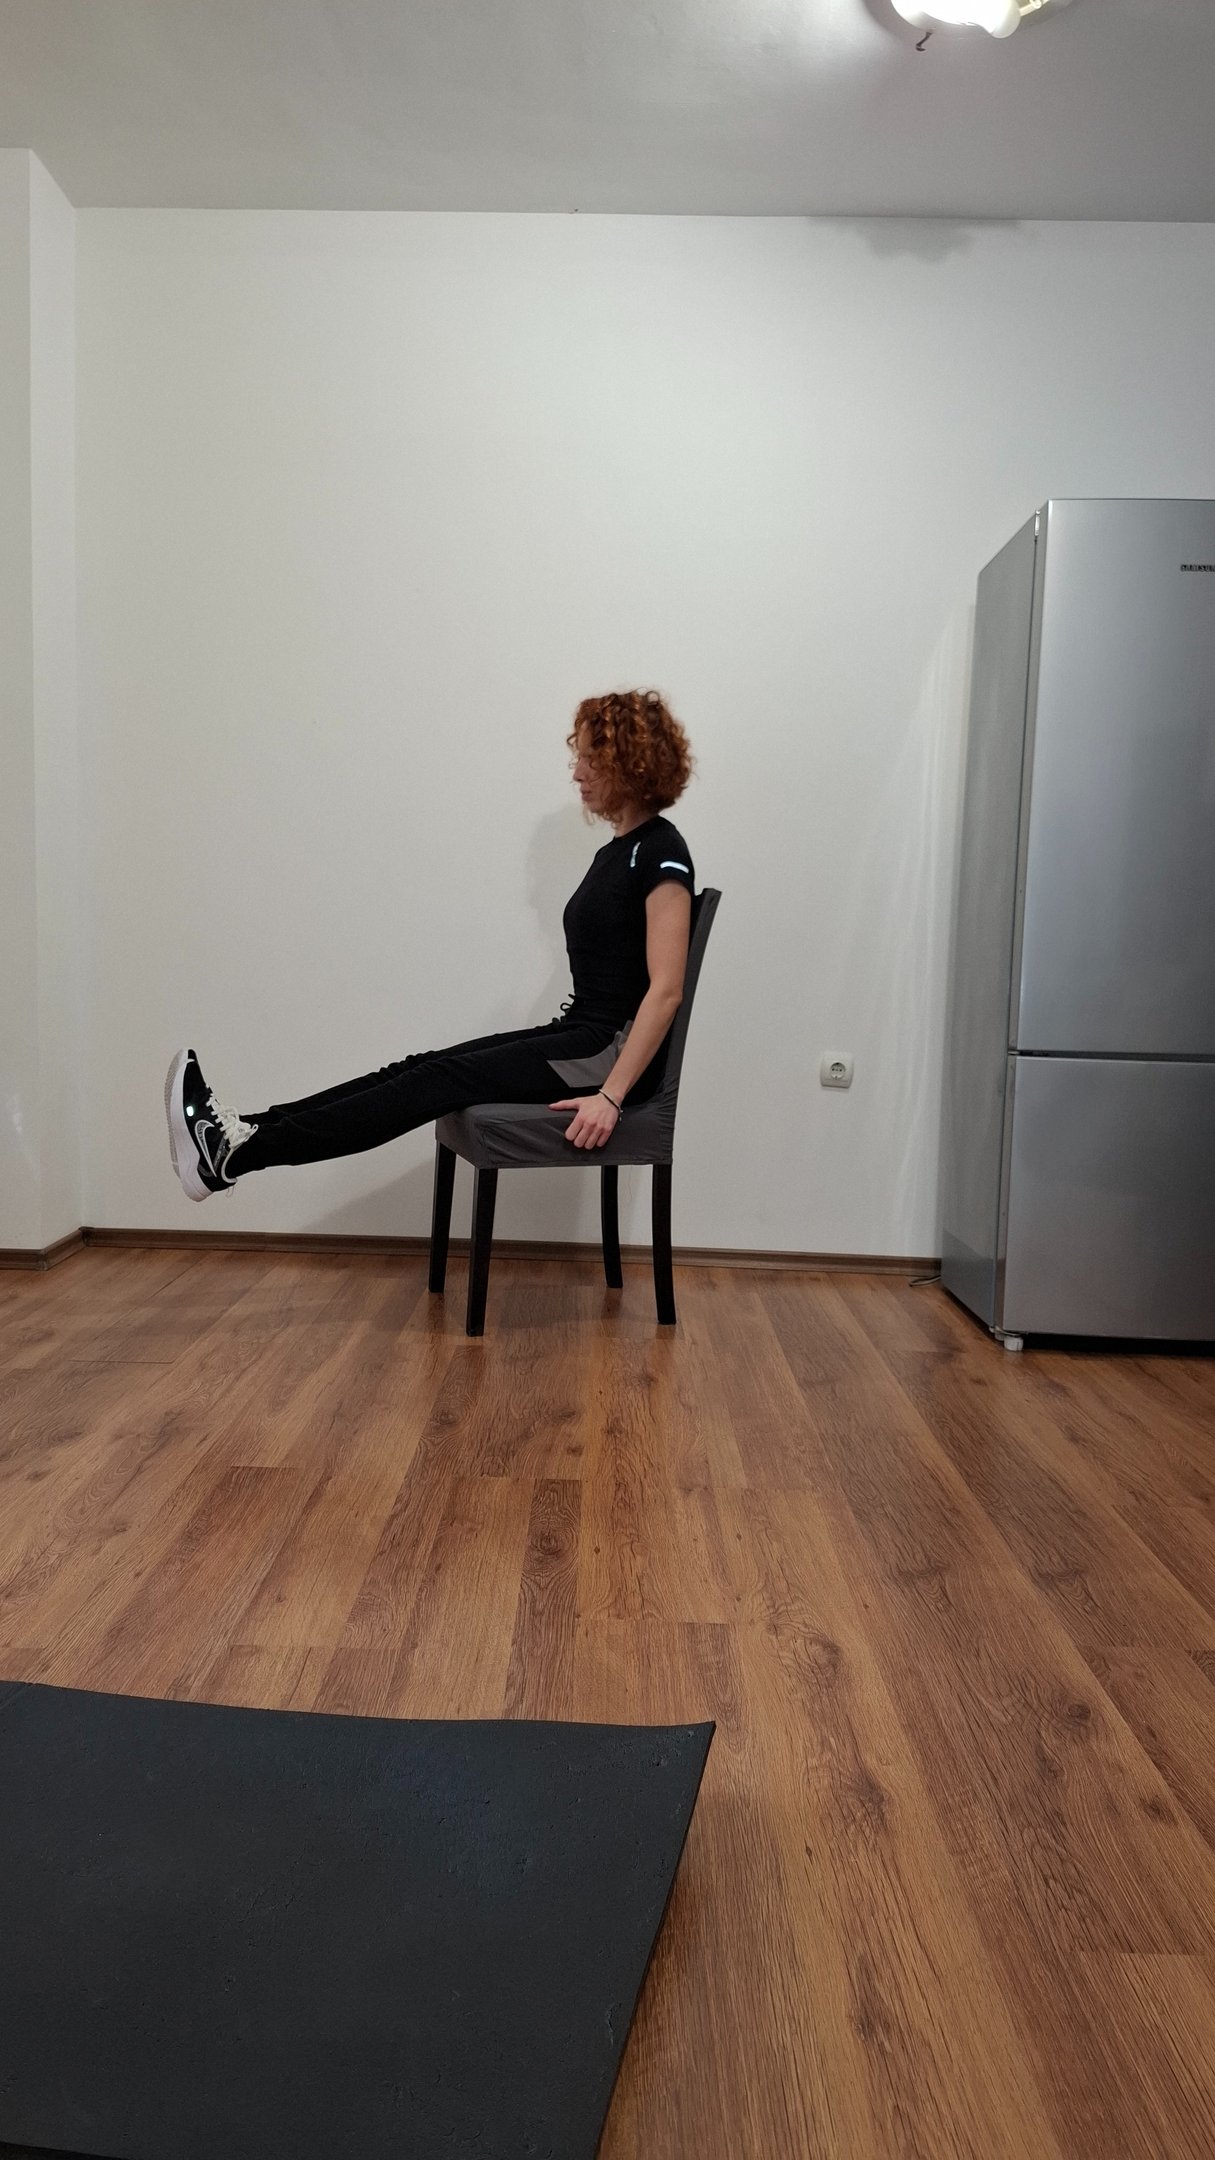
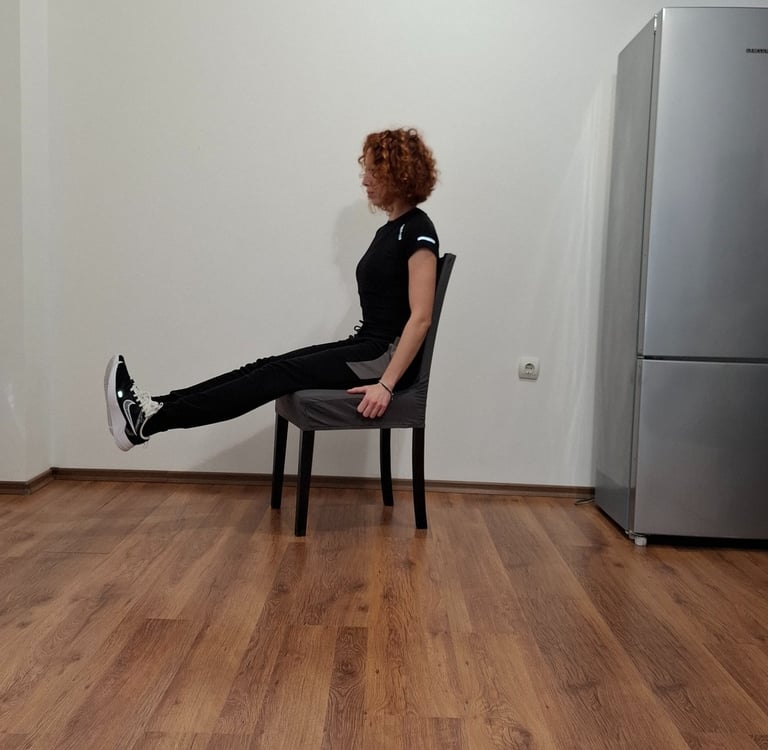
2. Single-Leg Extension (Using Body Weight, Band, or Dumbbells)
How to Perform:
Sit on a chair with your back straight and feet flat on the floor.
Attach a resistance band to one ankle (or place a dumbbell on one thigh).
Extend the working leg straight out in front of you while keeping the other foot planted on the floor for stability.
Hold the extension for 1-2 seconds, focusing on contracting the quadriceps.
Slowly lower the leg back to the starting position.
Switch legs and repeat 10-15 repetitions per side.
Tips:
Perform the movement slowly to avoid using momentum.
Keep your toes flexed (pointing upward) to activate the quads fully.
For added resistance, increase the band tension or use a heavier dumbbell.
Benefits of Leg Extensions on a Chair:
Strengthens the Quadriceps: Improves knee stability and function, reducing the risk of pain and injury.
Improves Knee Mobility: Helps maintain joint flexibility and range of motion.
Low-Impact Exercise: Ideal for individuals with joint pain or those recovering from injuries.
Convenient and Versatile: Can be done almost anywhere with minimal equipment.
Safety Tips:
Start with body weight or light resistance, especially if you’re new to this exercise.
Avoid locking your knees at the top of the movement; keep them slightly soft.
Ensure the chair is sturdy and placed on a non-slip surface to prevent accidents.
By incorporating both single- and double-leg extensions into your routine, you’ll effectively strengthen your quadriceps and support your knee health, whether for rehabilitation or general fitness.
C. Pelvic Tilts
Pelvic tilts help strengthen the lower back and core muscles, providing better support for the spine.
How to Perform:
Lie on your back with knees bent and feet flat on the ground.
Tighten your abdominal muscles and gently tilt your pelvis upward.
Hold for 5 seconds, then relax.
Repeat 10-15 times for 2-3 sets.
6. Lifestyle Tips for Managing Knee and Back Pain
Stay Active: Avoid prolonged sitting or standing, as this increases stiffness and pain. Incorporate low-impact activities like walking, swimming, or cycling.
Maintain a Healthy Weight: Excess weight adds strain to the knees and lower back. Focus on a balanced diet and regular exercise.
Use Supportive Footwear: Poor shoes can worsen knee pain and affect your posture. Invest in comfortable, supportive shoes.
Posture Awareness: Maintain proper posture when sitting, standing, or lifting heavy objects to reduce strain on your back.
Heat or Cold Therapy: Use heating pads for muscle stiffness or ice packs for swelling and inflammation.
Conclusion
Knee and lower back pain can significantly impact daily life, but consistent efforts with stretching, massage, and targeted exercises can help alleviate discomfort and prevent future pain. Incorporating simple practices, such as castor oil massage and regular stretches like the knee-to-chest and spine twist, can make a world of difference. If pain persists or worsens, consult a healthcare professional to determine the best course of treatment.
By being proactive and dedicating time to self-care, you can enjoy a pain-free, active lifestyle!
Harmony Fitness
Ladies's Online Personal Trainer
Harmony Fitness
Online Personal training for women who want to transform their health and build lasting fitness habits.
Connect With Me
Get notified about news! No spam, just motivation!